Deploying the MSP Process Teams Bot Into a Microsoft Teams Environment
Introduction
When an end-user calls into your helpdesk, one of the options you can use to verify their identity is to send them an end-user verification code or link through Microsoft Teams.
In order to send the verification code or link through Microsoft Teams, you must first customize the MSP Process Teams bot, and then deploy it to your client's Microsoft Teams environment.
Customizing the MSP Process Teams Bot
- Login to the MSP Process UI (https://app.mspprocess.com)
- Navigate to the AI Service Desk -> Client Portal -> Teams Bot Configuration page
- Configure the Bot so that it has your logo, is named appropriately (so that you your customers will understand who the messages are coming from), and has an appropriate description:
- NOTE: For optimal readability, the logo you upload should be 192 x 192 pixels
- When everything has been configured, click the Get Zip File button
Deploying the Bot for Testing Purposes, to One User
You may wish to test out how the MSP Process Teams bot looks by first making it available in your own MS Teams environment. This can be done for a single user, allowing you (the user) to test things out before deploying it to your customers.
Source: These instructions come from a Microsoft KB article (here)
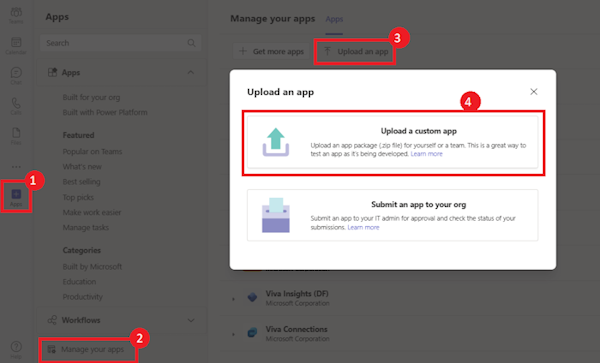
To upload the app to Teams
-
In the Teams client, select the Apps icon.
-
Select Manage your apps.
-
Select Upload an app.
-
Look for the option to Upload a custom app. If the option is visible, custom app upload is enabled.

Note: Contact your Teams administrator, if you don't find the option to upload a custom app.
-
Select Open to upload the .zip file that you created earlier.
-
Click Add.
-
Select Open to use the app in personal scope.
Alternatively, you can either search and select the required scope or select a channel or chat from the list, and move through the dialog to select Go.
Congratulations! You have now deployed your MS Teams bot into your MS Teams environment, and you've made it available for testing purposes.
Deploying the MSP Process Teams Bot to a Client's Microsoft Teams Environment
- Login to the Microsoft Teams Admin Center, and navigate to Teams Apps -> Manage Apps (Direct Link: https://admin.teams.microsoft.com/policies/manage-apps)
- Click on Actions -> Upload new app
- Click the Upload button to upload the .zip file that you created earlier.
- Once the app has been uploaded, navigate to Teams Apps -> Setup Policies
- Click the Add button to create a new policy
- Give this app policy an appropriate Name and Description
- In the Installed Apps section, click the Add apps button, and choose your MSP Process Teams bot
- Click Save
- Click on the Group policy assignment tab
- Click the Add button, and assign your app policy to the appropriate list of end-users (in this example, I'm assigning the app to everyone)
That's it! You've now deployed your customized version of the MSP Process Teams bot to your client's Microsoft Teams environment.
Sending End-user Verification Codes/Links through Microsoft Teams
Now that you've deployed your customized version of the MSP Process Teams bot to your client's Microsoft Teams environment, you can start sending them end-user verification codes or links. For ConnectWise, HaloPSA, SuperOps.ai, Syncro or Zendesk partners, you'll click on the red shield beside the user's e-mail address:
You'll then be able to send that end-user either a code or a link through Microsoft Teams by clicking the apporpriate button:
For our Autotask partners, you'll see the two new Teams-related options (Teams Code and Teams Link) in the Verification feature, in the drop-down menu: