Knowledge Base
Verify End Users from MSP Process - v2 Microsoft Authenticator
Login to https://app.mspprocess.com
Navigate to Contacts page and if not already selected, use the drop down to select your PSA/M365 Integration.
Then click on the Shield icon to the right next to any contact you'd like to verify:
Then click on the
Troubleshooting "Error during assigning of Application.ReadWrite.All application role" Errors Microsoft Authenticator
Scenario:
From the Integrations -> Security Integrations menu, you've deployed the MSP Process app for Authenticator into your customer's M365 tenants, but you're seeing the following failure:
Solution:
That error message comes up if your Microsoft user account hasn't yet been associated with the Privileged Role Administrator Entra role in the Microsoft Partner Center.
To address this, there are two steps to follow:
- Linking your Microsoft user account to a Security Group
- Linking that Security Group to the appropriate Entra role
Associating your Microsoft user account with a Security Group
- Login to your Entra portal (https://entra.microsoft.com)
- Navigate to the Users -> All Users page
- Search for your Microsoft user account, and then click into it
- On the Groups tab of the the Microsoft user account, ensure that it's associated with a Security Group that will be assigned the Privileged Role Administrator Entra role (in the screenshot below I've created a group called GDAP - Priviledge Role Administrator for this purpose):
Linking that Security Group to the Entra Role in the Microsoft Partner Center
- Login to the Microsoft Partner Center (https://login.microsoftonline.com/)
- Click on the Customers button
- From the list of customers, click into one customer
- Click on the Admin Relationships tab, on the left-hand side of the web page
- Click into an "active" Admin Relationship
- Ensure that the Admin Relationship includes the Privileged Role Administrator Entra role (1), that the Security Group is associated with the Admin Relationship (2), and that the Privileged Role Administrator Entra role has been linked to the Security Group (3):
Save your changes, and that's it! You can now try the deployment of the MSP Process app for Authenticator again.
Troubleshooting "Please enable the 'Azure Multi Factor Auth Client' enterprise application for this M365 tenant" Errors Microsoft Authenticator
Scenario:
From the Integrations -> Security Integrations menu, you've deployed the MSP Process app for Authenticator into your customer's M365 tenants, but you're seeing the following failure:
Solution:
- Login to that client's Azure portal (https://portal.azure.com)
- Navigate to the Enterprise Applications page
- Search for the Azure Multi Factor Auth Client app - note that you'll need to remove the Application Type == Enterprise Applications filter:
- On the Properties tab of the app, ensure that the Enabled for users to sign-in option is enabled:
- Click the Save button at the top of the page
That's it! You can now try the deployment of the MSP Process app for Authenticator again.
Deploying the MSP Process Authenticator app to M365 Tenants through the Microsoft Partner Center Microsoft Authenticator
Introduction
Microsoft's Authenticator app is a great tool to use when verifying someone's identity through the MSP Process platform - it's more secure than just sending an SMS message, it can leverage additional biometric security mechanisms like Apple's FaceID, and it's convenient - your end-users likely already have the Microsoft Authenticator app on their phone.
In order for the MSP Process platform to send a push notification to your end-users, there are configuration steps that must be taken within that end-user's M365 tenant. This KB article will guide you through using GDAP Relationships in your CSP-model M365 tenant to complete those steps.
Prerequisites
- Your end-user's M365 tenants must have an Entra P1 license (or higher) assigned to it
- You must have the credentials for a user account in your CSP-model M365 tenant that is:
- a member of the AdminAgents group in your CSP-model M365 tenant
- Granted the Assists your customers as -> Admin agent permission in the Microsoft Partner Center:
1. Adding Groups to Microsoft Entra
You need to create three new Groups in Microsoft Entra - we suggest calling them GDAP - Application Administrator, GDAP - Privileged Role Administrator and GDAP - User Administrator - and then associate that user account mentioned in the Prerequisites section to those three Groups.
- Login to the Microsoft Entra Admin Center (https://entra.microsoft.com/)
- Navigate to Groups -> All Groups
- Click the New Group Button
- Fill in the Group details as outlined below:
- Group Name: GDAP - Application Administrator
- Microsoft Entra roles can be assigned to the group: Yes
- Click the No Members Selected link, and select the user account mentioned in the Prerequisites section
- Click Create
- Repeat steps 3 and 4 for the GDAP - Privileged Role Administrator and GDAP - User Administrator group.
2. Requesting an Admin Relationship
For each M365 child tenant that you want to deploy the Microsoft Authenticator module into, you are required to create an Admin relationship from the Admin Relationships page in Partner Center.
- The GDAP - Application Administrator Group would get assigned the Application Administrator Entra Role
- The GDAP - Priviledged Role Administrator Group would get assigned the Privileged Role Administrator Entra Role
- The GDAP - User Administrator Group would get assigned the User Administrator Entra Role
- Login to the Microsoft Partner Center (https://partner.microsoft.com/)
- Click on the Customers card
- In the menu structure on the left, click on the Administer menu item
- Click the Request Admin Relationship button
- Request a relationship that includes the Application Administrator, Privileged Role Administrator and User Administrator Entra Roles
- Enable the Auto Extend option
- Click Finalize Request to complete the Admin Relationship request
3. Associating Entra Roles with the Correct Group
Now that an Admin Relationship has been created between your CSP M365 tenant and your client's M65 tenant, you must create an association between the Group created earlier in Entra and the Entra Roles specified in the Admin Relationship.
- Login to the Microsoft Partner Center (https://partner.microsoft.com/)
- Click on the Customers card
- In the menu structure on the left, click on the Administer menu item
- Click into the client's M365 tenant
- Click into the Admin Relationship created in the last section
- Click the +Add Security Groups button
- Choose the GDAP - Application Administrator group
- Choose the Application Administrator Entra role
- Click Save
- Repeat steps 6 thru 8 for the GDAP - User Administrator group and User Administrator Entra role
- Repeat steps 6 thru 8 for the GDAP - Privileged Role Administrator group and Privileged Role Administrator Entra role
4. Obtaining the Redirect URI for the App Registration
You'll be creating an App Registration in your CSP-model M365 tenant; as part of configuring that App Registration, you'll need a Redirect URI - let's grab that from MSP Process:
- Login to the MSP Process UI (https://app.mspprocess.com)
- Navigate to Integrations -> Security Integrations
- Click the Add New Integration button
- Click on Microsoft Authenticator
- Click the CSP-model M365 Tenant button
- In the pop-up window that appears, click on the copy icon for the Link for Redirect URI parameter:
- Leave the MSP Process window open; we'll be coming back to it in just a few minutes.
5. Configuring the App Registration in your CSP-model M365 Tenant
-
- Login to your Microsoft Azure portal (https://portal.azure.com)
- Navigate to App Registrations
- Add a new App Registration, and configure it as follows (note that the URL will change, depending on the ID of your M365 integration):
- Name: MSP Process: MS Authenticator Deployment App
- Supported Account Types: Accounts in any organizational directory (Any Microsoft Entra ID tenant - Multitenant)
- Redirect URI: Web; URI: This is the URI you copied from the previous step, in MSP Process
- Click Register when you're ready.
6. Adding Permissions to the App Registration
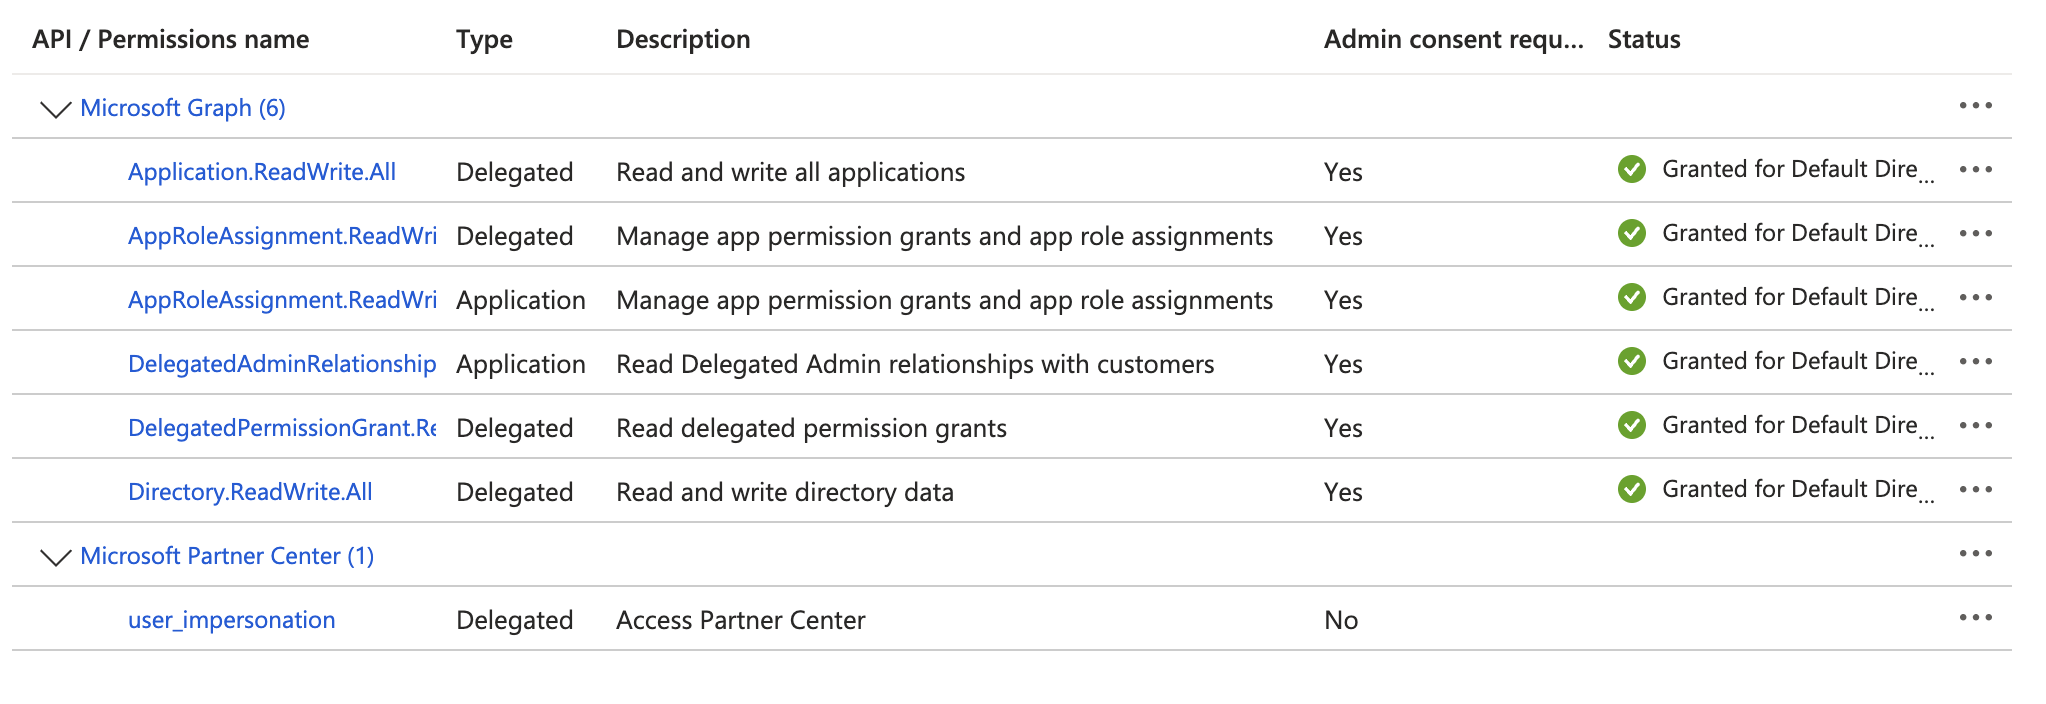
You're going to be adding 7 permissions to the App Registration - 6 from the Microsoft Graph API, and 1 for the Microsoft Partner Center. When you're done, the permissions API permissions page will look like this:
Adding the Application-level Permission
You're going to do the following steps twice - once for the AppRoleAssignment.ReadWrite.All permission, and then a second time for the DelegatedAdminRelationship.Read.All permission.
-
- Within the App Registration, go to Manage -> API permissions
- Remove the ‘User.Read’ permission
- Click the Add a permission button
- Click Microsoft Graph > Application Permissions
- Search for DelegatedAdminRelationship.Read.All, and put a checkmark beside it
- Click the Add Permissions button
-
Adding the Delegated-level Permissions
You'll complete the steps in this section 4 times - once for each of the following permissions: - - Application.ReadWrite.All
- - AppRoleAssignment.ReadWrite.All
- - DelegatedPermissionGrant.Read.All
- - Directory.ReadWrite.All
-
- Click the Add a permission button
- Click Microsoft Graph > Delegated Permissions
- Search for Application.ReadWrite.All, and put a checkmark beside it
- Click the Add Permissions button
-
Adding the Partner Center Permission
- Finally, let's add the Partner Center permission that is needed; click the Add a permission button
- Go to the APIs my organization uses tab
- Search for fa3d9a0c-3fb0-42cc-9193-47c7ecd2edbd (this is the ApplicationID of the required permission)
- Click on the resulting Microsoft Partner Center entry
- Put a checkmark beside the user_impersonation permission
- Click the Add Permissions button
-
Granting Admin Consent
- Click the Grant Admin Consent button
- Click the Grant Admin Consent button
-
7. Creating a Client Secret & Providing the App Registration Information to MSP Process
-
- Within the App Registration, navigate to Manage -> Certificates & Secrets, and add a new Client Secret.
- Copy the Value (not the Secret ID), as you'll need it in just a moment
- Back in MSP Process, fill in the rest of the fields in that Connect to Microsoft 365 (GDAP) pop-up window:
- The Domain Name of your M365 CSP tenant (this is the Primary Domain that you'd see on the Home page, in Microsoft Entra)
- The Application ID of the app you just registered; this can be found on the Overview page of the App Registration
- The Client Secret from step #17
- Click Submit
- In the Microsoft window that appears, sign-in to your CSP-model M365 tenant
- Follow the prompts to provide MSP Process with the required permissions:
- You'll be brought back to the MSP Process UI
- If you then click into the Microsoft Authenticator card, you'll see the child tenants we've been able to successfully setup:
- Within the App Registration, navigate to Manage -> Certificates & Secrets, and add a new Client Secret.
At this point, you've setup MSP Process to use Microsoft Authenticator to verify the end-users in that M365 tenant with their Microsoft Authenticator app. You'll now see Microsoft Authenticator available as an option within your PSA:
ConnectWise/Halo PSA:
Autotask:
Modifying a user's Default Sign-in Method in M365 to be "Microsoft Authenticator" Microsoft Authenticator
Introduction:
When you send a verification request to someone's Microsoft Authenticator app, you may see an error message in MSP Process saying that the user has a different "Default Sign-in Method" specified.
In this situation, the user will not receive your verification request as a push notification in their Microsoft Authenticator app.
The goal of this KB article is to show you where in M365 you can go to modify a user's default sign-in method.
Steps to resolving the Error:
- Login to the Microsoft Entra admin center (https://entra.microsoft.com/?l=en.en-us) as a user who has the rights need to modify someone's identity in Entra
- Navigate to Protection -> Authentication methods
- Under the Monitoring section, click on User Registration Details
- Click on the user who's preferred authentication method you want to modify
- In the MFA Status card, click on Manage MFA Authentication methods
- Click on the pencil icon that allows you do edit the Default sign-in method
- Choose Microsoft Authenticator from the drop-down menu
- Click the Save button, and you're done!
Deploying the Microsoft Authenticator Module to a Specific M365 Tenant Microsoft Authenticator
Introduction
Microsoft's Authenticator app is a great tool to use when verifying someone's identity through the MSP Process platform - it's more secure than just sending an SMS message, it can leverage additional biometric security mechanisms like Apple's FaceID, and it's convenient - your end-users likely already have the Microsoft Authenticator app on their phone.
In order for the MSP Process platform to send a push notification to your end-users, there are configuration steps that must be taken within that end-user's M365 tenant. This KB article will guide you through those steps.
Prerequisites
- Your end-user's M365 tenant must have an Entra P1 license (or higher) assigned to it
- You must have a set of credentials for your customer's M365 tenant that have Cloud Application Administrator permissions.
Configuring an M365 Tenant
The following steps must be done for each M365 tenant.
- Login to the MSP Process UI (https://app.mspprocess.com)
- Navigate to Integrations -> Security Integrations
- Click the Add New Integration button
- Click on Microsoft Authenticator
- In the Microsoft window that appears, sign-in to your customer's M365 tenant
- Follow the prompts to provide MSP Process with the required permissions
- ; when that's completed, you'll be brought to the following page:
- Click the Tap to finish onboarding button
- You'll be brought back to the MSP Process UI
At this point, you've setup MSP Process to use Microsoft Authenticator to verify the end-users in that M365 tenant with their Microsoft Authenticator app. You'll now see Microsoft Authenticator available as an option within your PSA:
ConnectWise/Halo PSA:
Autotask:
Verifying End Users within MSP Process Portal Microsoft Authenticator
This article is for verification using MSP Process portal. Some of our integration vendors do not support an embed capability where we can embed our End User verification in their app. In that case you can use the instructions below:
Login to https://app.mspprocess.com
Go to -> Ticketing -> PSA Ticketing
Then search for the ticket number/contact etc and click on the lock to the right to initiate a verification.
Click on the lock button to the right of the ticket you'd like to verify the user on.
Then select the shield next to the Email or Phone Number you wish to use to verify your end user. Make sure the contact on the ticket has a mobile phone number on it if you are attempting to use SMS verification.
Once verified you'll be returned to the verification screen and the contact will show in green for verified as shown below: