Knowledge Base
Setting up the M365 Password Reset Module How to Articles
Context:
MSP Process allows you to reset a user's M365 password, right from within your PSA, or from the Contacts/Tickets pages in the MSP Process UI. Using the feature is exceedingly easy, but there are a few quick setup steps that need to be taken before the feature can be used.
Linking MSP Process to your M365 Environments
You'll need to deploy our Enterprise Application to your customer's M365 environments before MSP Process can change an end-user's password.
Creating the App Registration
- Login to your Microsoft Azure portal (https://portal.azure.com)
- Navigate to App Registrations
- Add a new App Registration, and configure it as follows (note that the URL will change, depending on the ID of your M365 integration):
- Name: MSP Process: M365 Password Reset
- Supported Account Types: Accounts in this organizational directory only (Default Directory Only- Single Tenant)
- Redirect URI: This is an optional field; please leave it blank
-
- Click Register when you're ready.
-
Assigning Permissions
- Within the App Registration that you just registered, navigate to the Manage -> API permissions blade
- Configure the App Registration to have the following permissions:
- Click the Grand admin consent for button
Creating a Client Secret
- Within the App Registration, navigate to the Manage -> Certificates & Secrets blade
- Click the + New client secret button
- Specify a name for this client secret, and set the expiration date to be 730 days (24 months)
- Click the Add button
- Copy the Value of this new client secret - you'll need it in the next section
Configuring MSP Process to Communicate with the App Registration
- Login to MSP Process (https://app.mspprocess.com) as an Admin-level user
- Navigate to the Settings -> Integrations -> Security Integrations page
- Click on the Add New Integration button
- Click on the M365 Identity Management button
- Fill in the required fields:
- Click the Submit button to finish setting everything up
Using the Password Reset Feature
The Password Reset feature is available in the MSP Process UI, from either the Contacts page or the Tickets page. It's also available in the ConnectWise and HaloPSA "pods", and will shortly be available in the Autotask Insight.
In order to change a user's M365 password, they must first be verified using the End-User Verification feature. If they haven't yet been verified, we'll show you this handy message when you hover over the Password Reset button:
Once you've verified the user's identity though, you can then invoke the Password Reset feature:
You'll then be asked to confirm that you want to reset their password:
What Is Your End-User's Experience?
We send the user their new password through our Secure Data Sharing feature - ensuring a branded and consistent experience. The link to their new password is sent as an SMS message, to the phone number they have registered in Microsoft as an Authentication Method:
Deploying the Tech Verification Widget Technician Verification
Context
The Tech Verification widget helps you prevent your customers from falling victim to an identity phishing attack. Easily embedded as an iframe in your website, the Tech Verification Widget makes it easy for your customers to verify the identity of the technician who has called them.
Configuring the Tech Verification Widget
- Login to MSP Process (https://app.mspprocess.com) as an Admin-level user
- Navigate to the Identity Management > Verification > Tech Verification Widget page
- Customize the look of the widget so that it matches your website - you can change the text that the widget displays, the background color of the widget, and the button color:
- Choose whether or not you want to protect the widget with a CAPTCHA checkbox; enabling this helps ensure that your system doesn't get spammed by somone maliciously submitting a multiple Tech Verification requests
- Click Submit when you've finished customizing the widget
Deploying the Tech Verification Widget into your Website
On the Tech Verification Widget page in MSP Process, click the following button to grab the iframe code you'll need to add to your website:
Add that code to the body of your website; once that's done, you'll see the Tech Verification widget on the site. Here's one example:
FAQ:
Q: How do I change the text that is shown to the end-user once they have verified the technician's identity?
From the Identity Management > Verification > Verification Settings page, in the Tech Verification Settings section:
Q: How do my techs respond to the Tech Verification request?
- If you're using Autotask, ConnectWise or HaloPSA, you'll respond by going into the Tech Verificaiton module in the MSP Process Pod/Insight, in your PSA.
- If you're using a different PSA, you'll login to MSP Process (https://app.mspprocess.com) and go to the Identity Management > Verification > Tech Verification page.
Auto-Provisioning and Deprovisioning Users from M365 into MSP Process Account Management and Security
Overview:
Onboarding and offboarding employees is something MSPs always look to make as efficient as possible. By taking advantage of Microsoft's support for the SCIM protocol, it's easy to provide your technicians with access to MSP Process simply by adding and removing them from Security Groups in Microsoft 365. This KB article will walk you through the steps you'll need to follow.
Creating the Enterprise Application in Microsoft Azure
- Launch the Azure management portal (https://portal.azure.com)
- Browse to Microsoft Entra ID.
- On the left side select Enterprise applications.
- At the top of the page select + New application.
- Select the + Create your own application.
- Add the name of the application, for instance MSP Process SCIM.
- Select the radio button Integrate any other application you don't find in the gallery (Non-gallery) and click Create.
- On the left side under Manage select Provisioning.
- Again on the left side under Manage select Provisioning.
- Change the Provisioning Mode to Automatic.
- Expand Admin Credentials
Grabbing the Tenant URL and Secret Token from MSP Process
- In a separate browser tab, login to the MSP Process platform (https://app.mspprocess.com) as an Admin-level user
- Navigate to the Settings -> User Management -> SSO page and find the Tenant URL and Secret Token fields.
- Come back to Azure portal
Finishing the Configuration of the Enterprise Application in Microsoft Azure
- In the Admin Credentials section of the Enterprise application, make sure that Authentication Method is Bearer Authentication.
- Paste the found Tenant URL and Secret Token to the fields under Authentication Method.
- Click Test Connection.
- If it’s successful, then Save the configuration.
- Expand the Mappings section.
- Click on Provision Microsoft Entra ID Groups, make it disabled and Save the change.
- Click on Provision Microsoft Entra ID Users.
- Make sure that the following attribute mappings are set:
customappsso Attribute Microsoft Entra ID Attribute
userName userPrincipalName
displayName displayName
externalId objectId
- Click the Add New Mapping button at the bottom of the page
- Configure it as shown below:
- Mapping Type= Expression
- Expression = SingleAppRoleAssignment([appRoleAssignments])
- Target Attribute = roles[primary eq "True"].value
-
- Save the user mappings changes.
- In a new browser tab login to Azure, go to App registrations and find the App Registration that's been created.
- On the left side under Manage select App roles.
- Remove the User role:
- Edit the User role, and uncheck the Do you want to enable this app role? option
- Save the change
- Edit the User role again, and click the Delete button
- Edit the User role, and uncheck the Do you want to enable this app role? option
- Add Admin and Technician roles - both the Display name and the Value here needs to exactly match "Admin" or "Technician", as this is what assigns the user a specific role in MSP Process.
Pushing Users from Microsoft Into MSP Process
- In the other browser tab, where you were editing the Enterprise Application, click on the Manage -> Users and Groups tab.
- Click on + Add user/group.
- Select the security group(s) to be provisioned.
- Select the Role for the group and click Assign.
- On the left side under Manage select Provisioning.
- Click on the Start provisioning button.
Results!
It'll take anywhere from 10-40 minutes for Microsoft to provision users into MSP Process; it depends on how many users you've got in the Security Groups.
If you're interested in how Microsoft describes why provisioning through SCIM can take a bit of time, and what you should expect in your specific circumstance, check out this KB article:
Check the status of user provisioning
You can see how things are going from the Settings -> User Management -> Users page in MSP Process.
Logging in as as Provisioned User
Your technicians just need to click the Microsoft button on the MSP Process login page:
Syncing Contacts with Microsoft 365 (Using Admin Relationships in the Microsoft Partner Center) How to Articles
Introduction
The MSP Process platform can sync contacts from a variety of sources, including many common PSA platforms in the MSP market. Some MSPs don't use a supported PSA though - for example, they use an uncommon PSA, or they've built their own, homegrown solution. In other cases, Microsoft 365 is the "source of truth for a Contacts", and the PSA is downstream/synching contacts from Microsoft 365, so it makes sense to directly update those contacts in Microsoft 365, instead of in the PSA.
In those scenarios, MSPs can configure the MSP Process platform to directly sync Contacts with the end-user's Microsoft 365 contacts - allowing the MSP to leverage the End-user Verifcation, Secure Data Send, and Broadcast messaging features that are built into the platform.
Prerequisites:
- You must have Admin relationships setup in the Microsoft Partner Center to each of the M365 tenants you want to link to MSP Process
- Those Admin Relationships must include the Application Administrator and User Administrator Entra Roles
- Those Admin Relationships must apply the Application Administrator role to a Security Group (ideally one dedicated to this purpose, such as "GDAP - Application Administrator") and must also apply the User Administrator role to a Security Group (again, ideally one dedicated to this purpose, such as "GDAP - User Administrator")
- The Microsoft user account you intend to use during this setup process must be a member of those aforementioned two Security Groups in M365
Linking MSP Process with Microsoft 365
- Login to the MSP Process UI
- Navigate to the Integrations -> PSA Integrations menu
- Click the Add button
- Click on the Microsoft 365 option
- Specify a name for the integation, and click the Submit button
- Click on the Microsoft 365 card that is now listed on the PSA Integrations page
- Click the Connect to Microsoft 365 (GDAP) button
- In the pop-up window that appears , click the Link for Redirect URI button:
Keep the MSP Process window open; in a separate browser tab login to https://portal.azure.com.
Configuring the Integration for a M365 Cloud Solution Provider (CSP) Environment
NOTE: The Admin Relationships you've established with your client's M365 tenants must have the Application administrator and User administrator roles assigned.
- Login to your Microsoft Azure portal (https://portal.azure.com)
- Navigate to App Registrations
- Add a new App Registration, and configure it as follows (note that the URL will change, depending on the ID of your M365 integration):
- Name: MSP Process GDAP Contact Sync App
- Supported Account Types: Accounts in any organizational directory (Any Microsoft Entra ID tenant - Multitenant)
- Redirect URI: Web; URI: <paste in the URI from the previous section, from MSP Process>
- Within the App Registration, go to Manage -> API Permissions, and assign the app the following permissions:
- NOTE: For the user_impersonation permission for the Partner Center, there are two identically-named permissions. It's confusing. To save yourself an enormous headache, search for applicationID fa3d9a0c-3fb0-42cc-9193-47c7ecd2edbd - that'll bring up the correct permission.
- Within the App Registration, navigate to Manage -> Certificates & Secrets, and add a new Client Secret. Copy that Client Secret, as you'll need it in just a moment
- In MSP Process, within the M365 integration that you created earlier, click the Connect to Microsoft 365 (GDAP) button
- In the pop-up window that appears, enter the required information:
- The Domain Name of your M365 CSP tenant (this is the Primary Domain that you'd see on the Home page, in Microsoft Entra)
- The Application ID of the app you just registered; this can be found on the Overview page of the App Registration
- The Client Secret from step #5
- Click Submit
- When prompted, enter your Microsoft credentials
- Once you're returned to the MSP Process UI, wait for just 1-2 minutes, and then reload the page. You'll see your GDAP-linked tenants:
- Click the Sync Companies button, and then the Sync Users button
Interacting with Microsoft 365 Contacts in the MSP Process UI
Once you've integrated MSP Process with one or more Microsoft 365 tenants, you can view those Contacts from the Contacts menu:
From the Contacts page, you can view the Mobile Number and E-mail address of each contact. From the Actions column, you can open the MSP Process Pod, which will allow you to perform End-user Verification, securely send your customers data, and respond to Technician Verification requests.
Dynamic Filters SMS
Introduction
The Broadcast Messages feature lets you send text messages, in bulk, to your customers. Dynamic Filters is a complimentary/supporting feature that lets you easily find the end-users you need to reach, based on custom fields and other properties that are in your PSA.
Supported PSAs
The Dynamic Filters feature supports both Autotask and ConnectWise.
Creating a Dynamic Filter
- Login to the MSP Process website (https://app.mspprocess.com) as an Admin-level user
- Navigate to the Messaging -> Dynamic Filters page
- Click the Create Dynamic Filter button
- Give your Dynamic Filter a name, and choose your PSA integration:
- Depending on what Custom Fields (ConnectWise) or UDFs (Autotask) you have setup, you'll see a set of options that looks like this:
- Autotask:
- Connectwise:
- Autotask:
- All you need to do now is choose which filters you want to use; once you've selected and configured things as needed, you'll have a Dynamic Filter that looks something like this:
Testing your Dynamic Filter
As your creating or modify a Dynamic Filter, it's useful to see what Contacts the Dynamic Filter will find in your PSA. Fortunately that's an easy task - at the bottom right-hand corner of the screen, simply click the Test button to see the results:
Using a Dynamic Filter
Once you've saved your Dynamic Filter, navigate to the Messaging -> Broadcast Messages page. Type out the text message that you want to send, and click the Next button:
On the next page, click the Apply Dynamic Filter button to select your Dynamic Filter:
Review the contacts that are returned, and click Send when you're ready to send out that text message - that's all there is to it!
Using the Secure Data Request Feature How to Articles
Introduction
Secure Data Request is a feature that lets you ask your end-user for data. That request can be sent out as either an email or a text message, and it guides your end-user to a fully branded/whitelabeled page where they can choose to enter the information you've requested, or reject your request.
Let's walk through how to configure the Secure Data Request feature, and how to use it within your PSA.
Configuring Secure Data Requests
All aspects of Secure Data Requests are customizable - from the URL send to your customer (via the Custom Subdomains feature) to the Email and SMS templates that are sent out.
The configuration options for Secure Data Requests are available under the Secure Data Sharing -> Secure Data Settings page, on the Secure Data Request Settings tab:
You can also - on the Secure Data Request Templates tab - build out pre-canned wording for your team to use when they request data from their customer. Here's one example:
Using the Secure Data Request Feature
The Secure Data Request feature is super easy to use - enter the message that you want to send to the end user, click Get Link, and choose whether you want to send the request to the end-user as an Email or as an SMS message.
Autotask:
ConnectWise/HaloPSA/Kaseya BMS/Syncro/SuperOps:
Accessing Data That Your End-User Submitted
You can access the data your end-user submitted from the MSP Process Pod/Insight in your PSA, or from the Secure Data Sharing -> Secure Data Requests page. Note that the UI will only display requests that you (as an MSP Process user) have sent to an end-user.
Clicking on the green eyeball icon in the Actions column brings you to the details of that request:
Security
- Only the Technician who has requested data from an end-user can see the the data that end-user submitted. Other technicians won't see the entry from that end-user on the Request List tab (in the Pod/Insight) or on the Secure Data Sharing -> Secure Data Requests page.
- The Secure Data Sharing -> Secure Data Logs page provides a detailed overview of each Secure Data Request that has been sent out, as well as whether it's been submitted by the end-user
- The Settings -> User Management -> Activity Logs page shows when your technicians have generated Secure Data Requests
Integrating MSP Process with FreshService FreshService
Introduction
MSP Process has an in-depth integration with Freshservice; this KB article will walk you through how to set everything up. You'll be running through the following steps:
- Creating an API Key in Freshservice, for MSP Process to use
- Setting up the Freshservice integration in MSP Process
- Specifying the properties of tickets that MSP Process creates in Freshservice
- Installing the MSP Process app into your Freshservice tenant
Creating an API Key in Freshservice
- Login to your Freshservice UI (i.e. https://.freshservice.com)
- In the top right-hand corner of the UI, click on your User Profile, and open the Profile Settings menu
- On the right-hand side of the UI, interact with the Captcha to expose your API Key
- Copy your API key - you'll need it for the next step
Configuring Freshservice Integration in MSP Process
- Login to MSP Process (https://app.mspprocess.com) with an Admin-level account
- Navigate to the Settings -> Integrations -> PSA Integrations page
- Click on the Add new PSA button
- Choose Freshservice
- Enter the URL of your Freshservice instance, and the API key. Enable the "Store Contacts in MSP Process" option as well; this will ensure that the Contacts page in MSP Process loads quickly.
- Click the Submit button
- Fill in the Ticket Default settings - this controls the properties of tickets that MSP Process will create in Freshservice
- Click the Submit button
Installing the MSP Process app in Freshservice
- Navigate to https://www.freshworks.com/apps/msp_process/
- Click the Install button and follow the instructions to login to your Freshservice tenant
- On the Configuration tab of the MSP Process app, you'll need to enter the URL of your MSP Process Pod.
- This URL can be obtained from the Settings -> Integrations -> PSA Integrations page in MSP Process, by editing your Freshservice integration, and then clicking the Get Link to Pod button:
- Click the Install button in Freshservice to finish installing the MSP Process app
Using the MSP Process app at the Ticket level in Freshservice
- Open a service ticket in Freshservice
- On the right-hand side of the Freshservice UI, click on the MSP Process icon to open the app
Sending Contact Update Forms to Freshservice Contacts
- Open the Contacts page in MSP Process
- Put a checkmark beside each Contact to which you wish to send a Contact Update Form
- Click the Send Contact Update Form button
- Review the information; click Submit when ready
Introduction
On the Pro plan, MSP Process offers a feature called Broadcast Messages that lets you send out text messages in bulk to your end-users.
There are lots of scenarios where the Broadcast Messages feature can be useful, but here are a few of the most common:
- When a remote site has lost internet access, and you want to tell the employees there that you're working on the issue
- When there's a Microsoft outage (say for Exchange, or Teams), and you want to alert the primary points of contacts for your customers to let them know about the problem
- When a natural disaster occurs, and you want to inform your customers about updates related to their data, office locations or other emergency instructions
Using the Broadcast Messages Feature
Step 1: Composing the Text Message
- Login to the MSP Process UI
- Navigate to the Messaging -> Broadcast Messages page
- Write the text message that you wish to send; you can send messages up to 1,224 characters in length
- HINT: To create those pre-built Conversation Templates, head on over to the Ticketing -> Templates page
- Click Next when you're ready to proceed
Step 2: Choosing the Recipients
Now that you've composed the SMS message that you want to send, you need to specify who should receive it. There are 4 options to choose from:
Using a Dynamic Filter
A Dynamic Filter (configurable under the Messaging -> Dynamic Filters page) allows you to "live" query your PSA to find contacts that match specific criteria - such as having a mobile phone, bring a Primary Contact, or having a custom property or UDF set to a specific value. Using a Dynamic Filter is the recommended approach to sending out text messages, as it leverages the data you already have in your PSA, with no additional administrative overhead.
Dynamic Filters support both Autotask and ConnectWise.
Importing Users from your PSA
MSP Process makes it easy to search your PSA to find users under specific Companies. Click the From PSA button, choose your PSA Integration, and then you can select which Company you want to see the Contacts from:
Importing Users from a Messaging Group
A Messaging Group is a list of users that you've saved. You can create Messaging Groups from the Broadcast Messages page, by creating your list of recipients, and then clicking on the Add as New Messaging Group button at the bottom of the page. You can also create a Messaging Group from the Messaging -> Messaging Group page.
To import recipients from an already existing Messaging Group, click the From Messaging Groups button, choose your group, and then click Submit:
Manually Adding Users
The final (and highest administrative overhead) way of adding recipients to your bulk text message is to manually create them, by clicking the Add Manually button, and then enter in the recipient's name and phone number:
Sending the Text Message to your Recipients
Once you've assembled the list of recipients, simply click the Send button at the bottom right-hand corner of the screen to send it off:
Reviewing Sent SMS Messages
Once you click the Send button, a pop-up window will appear that shows you the results of your bulk SMS messages:
Congratulations! With just a few clicks, you've sent out a bulk text message to your clients. Easy-peasy, right?
Verify End Users from MSP Process - v2 Microsoft Authenticator
Login to https://app.mspprocess.com
Navigate to Contacts page and if not already selected, use the drop down to select your PSA/M365 Integration.
Then click on the Shield icon to the right next to any contact you'd like to verify:
Then click on the
Linking your MSP Process User Account to a ConnectWise Member How to Articles
Context:
MSP Process allows you to link your user account to a Member in ConnectWise - that linkage is used in several situations:
- When sending you a push notification through our MSP Process mobile app
- When you're adding a Time Entry to a ticket
- When creating a Schedule Entry (i.e. a Meeting) on a ticket
- When filtering the PSA Tickets page for "My Tickets"
Prerequisites:
- You must have a Ticket Default created within your PSA Integration, under the AI Service Desk -> Ticketing -> Ticket Properties page
Steps to follow:
- Login to MSP Process with your user account
- Edit your user account by clicking on the Account icon, in the top right-hand corner of the UI
- Enable the Link ConnectWise User option
- In the pop-up window that appears, choose the appropriate Ticket Default, and then select the appropriate Member from ConnectWise
- Click Submit to save your changes
Congratulations! You've now linked your MSP Process user account to a Member in ConnectWise.
Context:
MSP Process allows you to link your user account to a Resource (User) in Autotask - that linkage is used in two scenarios:
- When you're adding a Time Entry to a ticket - either from the PSA Tickets page, or with our MSP Process mobile app.
- When you're looking at the PSA Tickets page, and you want to use the "My Tickets" feature to limit that page to only show tickets to which you've been assigned.
Prerequisites:
- You must have a set of Ticket Properties created within your PSA Integration, under the AI Service Desk -> Ticketing -> Ticket Properties page
- Your Resource (User) in Autotask must have at least one Service Desk Role assigned to it, and one of those Service Desk Roles must be flagged as being the default:
Steps to follow:
- Login to MSP Process with your user account
- Edit your user account by clicking on the Account icon, in the top right-hand corner of the UI
- Enable the Link Autotask User option
- In the pop-up window that appears, choose the appropriate Ticket Default, and then select the appropriate Resource (User) from Autotask
- Click Submit to save your changes
Congratulations! You've now linked your MSP Process user account to a Resource (User) in Autotask.
Deploying the Pod to ConnectWise Project Tickets ConnectWise
The Scenario:
You've been happily using the MSP Process pod in your ConnectWise Service Tickets, and now you want to deploy it to your Project Tickets too. If this sounds like you, read on!
Step 1: Ensure The Correct Permissions Have Been Granted to MSP Process
- Login to ConnectWise PSA
- Navigate to System -> Security Roles
- Edit the Security Role for MSP Process
- Ensure that the Security Role includes the Project Tickets permission, and that both the Edit and Inquire permissions are set to All
- Save and close the Security Role
Step 2: Grab the URL from MSP Process for the Project Tickets Pod
- Login to MSP Process with an Admin-level account
- Navigate to Integrations -> PSA Integrations
- Edit your ConnectWise integration
- Click the Copy icon to grab the URL for the Project Ticket Pod:
Step 3: Add the Project Tickets Pod to ConnectWise
- In ConnectWise, navigate to System -> Setup Tables
- Search for the Manage Hosted API table
- Click the + sign to add an entry to the Manage Hosted API table
- Fill out the fields as shown below; save and close the entry when finished
Step 4: Add the Pod to your Project Ticket View
- Open a Project Ticket in ConnectWise PSA
- Click on the Gear icon in top right-hand corner of the ticket, and choose Pod Configuration:
- Find the MSP Process pod, and move it to the right-hand "Displayed" field:
- Press Save
Congratulations! Now you can login to the MSP Process pod from within your Project Tickets
Migrating Opt-in Data Between PSAs Contact Update Forms
Context:
You've been using MSP Process to send out Contact Update forms, and your clients have been filling them out. You're now in the process of moving from one PSA to another though, and you want to migrate the "Opt-in Status" of your contacts from your current PSA to your new PSA.
Prerequisites:
- MSP Process has an integration to your current PSA and your new PSA, under the Integrations -> PSA Integrations page
- You've got Opt-in status information linked to your current PSA that you want to migrate to your new PSA
- Your new PSA already has the same list of Contacts in it as your current PSA
Migrating Opt-in Status Data:
- Login to MSP Process (https://app.mspprocess.com) as an Admin-level account
- Navigate to the Integrations -> Opt-in Data Migrations page
- Select your current PSA from the Source PSA drop-down menu, and your new PSA from the Target PSA drop-down menu
- Click the Import button; when prompted, click Confirm to proceed
- You'll receive a report that shows you how many Contacts had their Opt-in Status updated in your new PSA, as well as if there any errors or issues:
Based on the report, you can then take action to correct things:
- You may need to add contacts in your new PSA
- You may need to update the email address of Contacts in your new PSA
Re-running the Opt-in Status Migration:
You can run the Opt-in Status Migration tool as many times as you need; this makes it easy to adjust things in your new PSA, and then simply re-run the Opt-in Status Migration tool to confirm that your changes addressed any issues.
Note that if you're making changes to Contacts in your new PSA, you should sync those changes into MSP Process before you re-run the Opt-in Status Migration tool. You can re-sync Contacts from the Integrations -> PSA Integrations page, by cicking the Sync Data button within your PSA integration.
Troubleshooting "Error during assigning of Application.ReadWrite.All application role" Errors Microsoft Authenticator
Scenario:
From the Integrations -> Security Integrations menu, you've deployed the MSP Process app for Authenticator into your customer's M365 tenants, but you're seeing the following failure:
Solution:
That error message comes up if your Microsoft user account hasn't yet been associated with the Privileged Role Administrator Entra role in the Microsoft Partner Center.
To address this, there are two steps to follow:
- Linking your Microsoft user account to a Security Group
- Linking that Security Group to the appropriate Entra role
Associating your Microsoft user account with a Security Group
- Login to your Entra portal (https://entra.microsoft.com)
- Navigate to the Users -> All Users page
- Search for your Microsoft user account, and then click into it
- On the Groups tab of the the Microsoft user account, ensure that it's associated with a Security Group that will be assigned the Privileged Role Administrator Entra role (in the screenshot below I've created a group called GDAP - Priviledge Role Administrator for this purpose):
Linking that Security Group to the Entra Role in the Microsoft Partner Center
- Login to the Microsoft Partner Center (https://login.microsoftonline.com/)
- Click on the Customers button
- From the list of customers, click into one customer
- Click on the Admin Relationships tab, on the left-hand side of the web page
- Click into an "active" Admin Relationship
- Ensure that the Admin Relationship includes the Privileged Role Administrator Entra role (1), that the Security Group is associated with the Admin Relationship (2), and that the Privileged Role Administrator Entra role has been linked to the Security Group (3):
Save your changes, and that's it! You can now try the deployment of the MSP Process app for Authenticator again.
Sending Notifications to a Slack Channel Data Ingestion & Notifications
Context
If you and your team use Slack for communications, MSP Process can alert you when an event occurs by sending notifications to a Slack channel. Examples of this include:
- Putting a message in a Slack channel when a critical priority ticket is logged in your PSA
- Putting a message in a Slack channel when one of the platforms you use to power your business (for example, your Backup solution) logs a failure
Creating the Slack App
- Login to the Slack API site (https://api.slack.com/apps)
- Click the Create an App button
- Choose the From a manifest option
- Choose which workspace you'd like to develop the app in; click Next to move to the next step:
- When prompted to insert a manifest, click on the YAML tab
- Enter the following text into the YAML tab
- _metadata: major_version: 1 minor_version: 1 display_information: name: MSPProcess features: bot_user: display_name: MSPProcess always_online: false oauth_config: scopes: bot: - incoming-webhook settings: org_deploy_enabled: false socket_mode_enabled: false token_rotation_enabled: false
- Click Next
- Click Create to finish creating the app
Customizing the Icon of the Slack App
By default, any new Slack app uses a default icon. You'll likely want to customize that icon, so that it's easier to see when MSP Process has posted to your Slack channel.
- In the https://api.slack.com/apps website, edit the MSP Process app that you just created
- Navigate to Settings -> Basic Information
- At the bottom of the page, in the Display Information section, upload the logo below into App Icon & Preview.
- Click the Save Changes button when ready
Creating a Webhook in Slack for MSP Process to Use
- In the https://api.slack.com/apps website, edit the MSP Process app that you just created
- Navigate to Features -> Incoming Webhooks
- At the bottom of the page, click the Add New Webhook button
- When prompted, choose which Slack channel this webhook will post into
- Once you've saved that webhook, copy it into your clipboard; you'll need it for the next step
Configuring a Notification To Send Messages to a Slack Channel
- Login to MSP Process
- Open the Notifications module
- Click the Create button to add a new Notification
- Configure the Notification as needed:
- Give it a Name
- Select which Data View it should use (for example, an App Bot or a Webhook)
- Enable the Slack output by clicking on it, and then configure the Slack settings by clicking the gear icon
- Configure how MSP Process will send messages into your Slack channel by doing the following:
- Provide the webhook URL from the previous section
- Configure what the payload of the message will be - note that you can use variables to insert dynamic data from the Data View
- Click Test to ensure that MSP Process is able to communicate with Slack; you'll see a "Hello, world" test message show up in the Slack channel
- Click Update to save the Slack configuration in MSP Process
- Click Create to save the Notification in MSP Process
Congratulations! You've now configured MSP Process to send a message to a Slack channel.
Setting up AI ChatAssist Client Portal
Introduction
AI ChatAssist is an AI-based chat tool that your end-users can interface with through our Client Portal and Microsoft Teams bot. Friendly, knowledgeable and eager to help, AI ChatAssist responds instantly to your end-users, and helps them to resolve the issue that they are experiencing. AI ChatAssist also creates a ticket will all the necessary information in your PSA - ensuring that your technicians have a detailed view of the problem and what steps were taken to resolve it.
Enabling AI ChatAssist
- Login to the MSP Process UI (https://app.mspprocess.com) with an Admin-level account
- Navigate to the Client Portal -> Configurations page
- Edit your Client Portal configuration
- Click on the Chats tab
- Put a checkmark beside the Use AI ChatAssist for Support Chats option
- Name your AI ChatAssist agent - this is the name your end-users will see when they are chatting with the agent
- Click Submit
Interfacing with AI ChatAssist as an End-User
When AI ChatAssist has been enabled for a Client Portal, your end-users will be able to interact with it by clicking the Chat With Support button from either the Client Portal or our Microsoft Teams bot:
Client Portal:
Microsoft Teams Bot:
By clicking the Chat With Support button, your end users will be presented with a user-friendly interface for describing their issue:
End-users can either type in the problem that they are experiencing, or they can choose from one of the convenient, one-click options.
Once your end-user clicks the Send button, a ticket is automatically created, and AI ChatAssist will start working with your end-user to resolve the problem:
Configuring a Custom Sub-Domain for URLs Sent to End-Users How to Articles
Context:
There are 3 features in MSP Process that can send your customers hyperlinks (URLs):
- End-user verification (using the Email Link or SMS Link options)
- Opt-in forms
- Secure Data Send
By default, the URLs those features send are on the https://app.mspprocess.com subdomain. As many MSPs wish to fully white-label the features provided by MSP Process, and also want their customers to only trust websites that the MSP controls or recommends, there is a feature in MSP Process that allows Admins to create a custom subdomain, and for MSP Process to use that subdomain when sending out URLs.
Prerequisites
- You'll need access to your DNS service provider, as you'll be creating two DNS records in your domain
- You'll want to have thought of a subdomain ahead of time - for example, secure.mymsp.com
Configuring a Custom Subdomain
- Login to MSP Process as an Admin-level user
- Navigate to the Settings -> Account Settings -> Custom Subdomain page
- In Step 1 of the wizard, specify the sub-domain that you want to use:
- In Step 2, add the specified DNS records in your DNS provider's UI
- In Step 3, click Validate to confirm that everything has been setup correctly; once the test passes, click the Save button to continue
- When prompted, click the Generate SSL Certificate button, and then click the Bind SSL Certificate button
Congratulations! You've now configured MSP Process to use a subdomain of your choosing when sending our URLs to your end-users.
Handling Errors
You may encounter the following error when clicking the Generate SSL Certificate button:
To resolve that issue, double-check that your CNAME record doesn't have proxying enabled. The screenshots below are from CloudFlare; your DNS provider may have a similar feature, but under a different name or in a different screen layout.
Good:
Bad:
Deleting a Custom Subdomain
If you need to delete the custom domain that you've configured, navigate to the Account Settings -> Custom Subdomain page, and click the
button:
Troubleshooting "Please enable the 'Azure Multi Factor Auth Client' enterprise application for this M365 tenant" Errors Microsoft Authenticator
Scenario:
From the Integrations -> Security Integrations menu, you've deployed the MSP Process app for Authenticator into your customer's M365 tenants, but you're seeing the following failure:
Solution:
- Login to that client's Azure portal (https://portal.azure.com)
- Navigate to the Enterprise Applications page
- Search for the Azure Multi Factor Auth Client app - note that you'll need to remove the Application Type == Enterprise Applications filter:
- On the Properties tab of the app, ensure that the Enabled for users to sign-in option is enabled:
- Click the Save button at the top of the page
That's it! You can now try the deployment of the MSP Process app for Authenticator again.
Telling Your Customers How To Contact You Client Portal
Introduction
The MSP Process Client Portal makes it easy for your customers to know how best to reach out to you - all they need to do is click on the ? icon in the top of the menu structure, and they'll be shown your contact information:
The pop-up that appears looks like this:
You can specify the information that is shown in that pop-up menu from the Client Portal -> Configurations tab; just edit your Client Portal configuration, and go to the Contact Info tab:
Receiving Ticket Updates from HaloPSA Data Ingestion & Notifications
Use Case:
You're an MSP who leverages HaloPSA, and you want MSP Process to be aware of ticket changes in HaloPSA, so that you can notify whomever is on-shift when critical issues come up.
The functionality outlined in this KB article is only available on the Pro plan for MSP Process.
Creating a Webhook Receiver in MSP Process
- Login to the MSP Process UI (https://app.mspprocess.com)
- Navigate to the Monitor and Notify > Webhooks page
- Click the Create button to create a new Webhook receiver
- Click the Get button to generate a URL
- Click the Copy (
) button on the right-hand side of the URL; you'll need the URL in the next section
- Leave this MSP Process window open, on this page; you'll be coming back to it in a later step
Configuring a Webhook Trigger in HaloPSA
- Login to your HaloPSA tenant
- Navigate to Configuration -> Webhooks
- Click the New button in the top right-hand corner of the HaloPSA UI
- Specify a name for the webhook (we recommend MSP Process - Ticket Status Changes)
- Paste the URL from the previous section into the Payload URL field
- In the Payload section, ensure that Full Object with linked objects is chosen in the Payload drop-down menu
- In the Events section, click the
button
- Choose New Ticket Logged from the Event drop-down menu
- Click Save
Sending A Test Event To MSP Process
- In HaloPSA, create a new ticket
- In the MSP Process UI, you'll see the webhook payload appear
- Specify a name for this Webhook Receiver in the Integration Name field
- On the right-hand side of the UI, uncheck any fields that you don't want to store or process.
- Ensure to check at least one instance of the ID field - this will tell MSP Process how to uniquely identify this event. In this context, choose the ticket_id field
- Click Submit
- In the Data View Creation pop-up that appears, check the link to webhook option, and then click the Create button
Congratulations! HaloPSA will now send webhook events to MSP Process whenever the status of tickets change.
For instructions on how to send notifications - through e-mail, SMS, Slack or Microsoft Teams - refer to this KB article.
Getting Notified If AI VoiceAssist Fails To Create A Ticket AI VoiceAssist
Introduction:
There are situations where AI VoiceAssist may fail to create a ticket in your PSA:
- If the PSA API credentials provided to MSP Process are disabled or changed, and MSP Process isn't updated accordingly
- If there are changes to what fields are mandatory in your PSA in order to create a ticket, and MSP Process isn't updated accordingly
- If there is a networking outage that affects MSP Process's ability to communicate with your PSA
In those situations, it's important to receive a notification about the fact that the call occurred, and that there was a problem creating the ticket. This KB article will walk you through how to configure those notifications.
Getting Notified on Ticket Creation Errors
- Login to the MSP Process UI (https://app.mspprocess.com)
- Click on the Profile button in the top right-hand corner of the UI:
- To receive e-mails about ticket creation issues, enable the Notify by email option; to receive a text message too, enable the Notify by SMS option:
- Click Submit to save your changes
When there is a ticket creation failure, you'll receive an e-mail from noreply@mspprocess.com that looks like this:
Notifying On Specific Ticket Details Data Ingestion & Notifications
Use Case:
You want to notify your technicians, with a text message, when a ticket's status changes - for example, to an "Escalated" status.
This KB article will guide you through what you need to setup; if you want to be notified for any other specific details observed in a ticket by sending an e-mail, a Slack message, or a Teams message, the same steps apply.
Ingesting Ticket Data From Your PSA:
For ConnectWise or Autotask, you'll setup an App Bot that will query your PSA every 5 minutes for ticket updates.
For HaloPSA, you'll configure HaloPSA to send a webhook event to MSP Process whenever a ticket changes status. Click here for the KB article that outlines those steps, and skip to the Configuring a Notification portion of this article.
- Navigate to Monitor and Notify > App Bots
- Click the Add New button
- Give the App Bot a name - such as Ticket Observer
- Choose the Autotask or ConnectWise ticket observer (depending on which PSA you use)
- The App Bot needs to know how to communicate with your PSA: choose the existing API connection from the PSA Integration menu
- Click Submit, then in the Data View Creation pop-up that appears, check the link to app bot option, and then click the Create button.
Viewing the Data From Your PSA:
If you're curious to see what data we've been ingesting from your PSA, you can see it from the Monitor and Notify > Data menu and selecting the appropriate Data View:
Configuring a Notification:
- Open the Notifications module (Monitor and Notify > Notifications):
- Click the Create button
- Give this Notification a name (for this example, we will create a notification for Ticket Status Changes to In Progress), and choose the Ticket Observer Data View:
- Open the Filter section, and find the StatusName field; click on the + sign on the right-hand side:
- Click on the + sign to choose from the list of Statuses that MSP Process has observed:
- Note: If we have just created the app bot and relevant data view, we may have yet to ingest any payloads - in this case either enter the Status Name(s) manually, or wait 5 minutes for the next sync.
- Select the status (or any other relevant field) you wish to be notified on, and click the > button to save your selection. The Filter section should now look like this:
- Scroll to the bottom of the Notification; click on SMS to enable that output, and then click on the "gear" icon to configure it:
- Configure who should receive the text message, either by manually typing in their phone number, choosing one of your technicians from the drop-down menu, selecting the assigned technician mobile number field, or specifying a Notification Group (see this article for Notification Group Setup). Also, configure the text message that is to be sent:
- Note: You may include any details specific to the payload observed by clicking the + next to the message field.
- Click Update when everything has been configured
- Click Create to finish creating the Notification
Congratulations! You've configured MSP Process to send your technician a text message whenever the status of a ticket is changed to a specific value. Using the steps outlined above, you can create any other notifications tied to other filters which you can specify in their own notification rules.
Introduction:
The MSP Process app allows technicians to quickly and easily view, triage and update tickets. One of the great new features introduced in the app is the ability to simply dictate a new time entry to the app, and have it create the time entry on your behalf.
This new capability is supported for ConnectWise and Autotask; let's dive in and see how it works.
Accessing the Voice-to-Time Entry Feature:
In the MSP Process app, go to the Tickets feature, and edit a ticket.
Click into the Time Entries section:
At the top of the Time Entries section, click the Microphone button:
Dictating a Time Entry:
Click the Microphone button to start dictating the time entry to the MSP Process app:
Reviewing and Processing your Transcription
Once you've finished dictating the ticket to the app, you'll have the opportunity to review what was transcribed before submitting it.
Once you've reviewed the transcribed text, click the Process button; the app will take 15-20 seconds to finish processing your submission, as it needs to query your PSA for Time Entry-related properties, such as Boards/Queues, Sources, Priorities and more.
Submitting the Time Entry
You'll have one final opportunity to review the properties of the ticket that is to be created; once you're happy with how everything looks, just click the Save button!
Introduction:
The MSP Process app allows technicians to quickly and easily view, triage and update tickets. One of the great new features introduced in the app is the ability to simply dictate a new ticket to the app, and have it create the ticket on your behalf.
This new capability is supported for ConnectWise and Autotask; let's dive in and see how it works.
Accessing the Voice-to-Ticket Feature:
At the top of the Tickets feature, click the Microphone button:
Dictating a Ticket:
Click the Microphone button to start dictating the ticket to the MSP Process app:
Reviewing your Transcription
Once you've finished dictating the ticket to the app, you'll have the opportunity to review what was transcribed before submitting it:
Processing the Transcription
Once you've reviewed the transcribed text, click the Process button; the app will take 15-20 seconds to finish processing your submission, as it needs to query your PSA for ticket-related properties, such as Boards/Queues, Sources, Priorities and more.
Submitting the Ticket
You'll have one final opportunity to review the properties of the ticket that is to be created; once you're happy with how everything looks, just click the Create Ticket button!
Issue
Some users have experienced an infinite call forwarding loop when configuring AI VoiceAssist. This happens when the forwarding number set for an agent is the same number that routes to AI VoiceAssist. As a result, AI VoiceAssist continuously receives and re-routes the same call without resolution.
Cause
When an agent forwards a call to a number that ultimately routes back to AI VoiceAssist, it triggers a loop. Since AI VoiceAssist tries to forward the call again (based on the agent configuration), the cycle repeats indefinitely, leading to call failures and poor customer experience.
Solutions
To prevent this issue, users have two options:
Option 1: Use a Different Forwarding Number
Direct AI VoiceAssist to forward calls to a different number that does not loop back to AI VoiceAssist. This can be:
-
A voicemail box
-
A call queue
-
A live agent line
-
Any number capable of handling or terminating the call
Example: If AI VoiceAssist is reached via number (555) 123-4567, avoid forwarding back to this same number or any alias that loops to it. Instead, forward to (555) 987-6543, which routes to a voicemail or support queue.
Option 2: Create a Custom Agent That Doesn't Forward Calls
For specific use cases where forwarding may cause issues, create a custom agent within AI VoiceAssist that is configured to:
-
Not forward calls
-
Handle the interaction fully within AI VoiceAssist (e.g., take a message, end the call gracefully)
This is ideal for scenarios where no live intervention is needed or to provide fallback handling without external routing.
Best Practices
-
Always double-check your call flow to ensure there are no circular routes.
-
Use call logs to verify how the call is being handled.
-
Document and label forwarding numbers clearly to avoid confusion.
Need Help?
If you need assistance configuring AI VoiceAssist, please contact your support team or refer to additional guides in our Help Center.
Importing Contacts from CSV How to Articles
Introduction:
If you're looking to do end-user verification on your helpdesk, but you happen to be using a PSA that MSP Process doesn't support, no worries! We allow for contacts to be imported from a CSV file into our database; once imported, you can then use the End-User Verification, Technician Verification and Secure Data Send features.
MSP Process supports importing files from the following sources:
- Microsoft Entra (https://entra.microsoft.com), under the Users -> All Users page
- Microsoft 365 (https://admin.microsoft.com), under the Users -> Active Users page
- Google Workspace
Importing Contacts into MSP Process
- Download the CSV file from Microsoft or Google
- Login to MSP Process (https://app.mspprocess.com)
- Navigate to the Settings -> Integrations -> PSA Integrations page
- Click the Add New Integration button
- Click the CSV button
- Specify a Name
- On the PSA Integrations page, click into your CSV integration
- Click the Import Data button
- Upload your CSV file
- Congrats! You've now uploaded contacts into MSP Process
Options During the Import Process
- The Remove other records option will erase any previously-uploaded contacts
- The Skip existing records option will ignore any existing contacts, and will not update their information
Interacting with Imported Contacts
Now that you've imported your contacts into MSP Process, you can interact with them from the Contacts page - it can be found at the very top of the left-hand menu in MSP Process:
On the Contacts page, find the end-user you're looking for, and then in the Actions column click the Pod icon:
Within the Pod, you'll then be able to perform end-user verification, securely send data using the Secure Data Send feature, and respond to Technician Verification requests:
Introduction:
All MSPs already have a phone number that their customers are familiar with - and some of those customers already text their MSP through that phone number.
While MSP Process offers a custom phone number for text-to-ticketing, there are scenarios where MSPs don't want to have to educate their customers to use a new phone number just for text message purposes.
There is a feature in MSP Process that lets our Partners configure a phone number - that they already have in their own Twilio account - be the phone number that their customers can use for text-to-ticketing, as the MSP's Outbound Messaging number, or as a ticket-specific SMS Channel number.
Prerequisites
- In Twilio, you must have a "Verified" A2P campaign setup
- In Twilio, you must have a Messaging Service created and linked to your A2P campaign
- In Twilio the Messaging Service, on its Integrations tab, must be configured to send webhooks:
Linking MSP Process to your Twilio Account
- Login to the MSP Process UI (https://mspprocess.com) as an Admin-level account
- Navigate to the Account Settings -> Twilio Account page
- Click the Add New button
- Specify a Name for this Twilio account, and the Account SID and Auth Token (these can be found in the Account Dashboard page of your Twilio account)
- Click the Test button; once it's confirmed as successful, click the Submit button
Selecting a Phone Number from your Twilio Account
- To view the list of phone numbers that are available in your Twilio account, click on the green eyeball icon in the Actions column:
- To make a specific phone number available as a text-to-ticket number, just click on the
icon in the Actions column
- Make sure to link your phone number to the appropriate Messaging Service in Twilio:
- Choose whether you want to use this phone number as a "Text-to-Ticket" number, as Ticket-specific "Pool" number, or as your Outbound Messaging number.
- Click the Import button to finish the process
Using Your Phone Number for Text-to-Ticketing
- Once the phone number has been imported from your Twilio account, navigate to the Messaging -> Configurations page
- Click the Add button
- You'll be able to select your Twilio phone number from the Phone Number drop-down menu:
- When you're ready, click Submit!
DUO: Securing Logins to the MSP Process Platform Using the DUO Mobile App Account Management and Security
Introduction
DUO (https://duo.com) is a popular identity verification platform. You can use it in MSP Process to acheive two goals:
- To secure the login process of anyone looking to access your MSP Process account at https://app.mspprocess.com. This capability requires the DUO Web SDK to be configured.
- During the end-user verification process; DUO can be used instead of sending the user a verification code via e-mail or SMS. This capability requires the DUO Auth API and Admin API to be configured. Click here for the KB article that outlines how to set this up.
This KB article will take you through all of the steps required to do the first scenario - to use DUO to secure how your technicians login to the MSP Process platform.
Step 1: Configuring the Web SDK Entity in DUO
What is the DUO Web SDK? The Duo Web SDK adds the two-factor authentication screens and workflow to the MSP Process login flow.
How is the Web SDK Used? This module only needs to be setup if you want to use DUO to secure how you and your techs login to the MSP Process platform. It is not required if you only plan on using DUO for End-User Verification.
- Login to the DUO Admin portal (https://admin.duosecurity.com/)
- From the left-hand menu, navigate to Application -> Protect an Application
- Search for "Web SDK" in the Search field
- Click on the Protect button beside Web SDK
- In the Details section, copy the Client ID, Client Secret and API Hostname; you'll need them later
- In the Settings section, change Name field to say "MSP Process"
- Under the Universal Prompt section, choose the Show traditional prompt option
- Click Save
- When prompted, choose No, thanks - you don't want to use the Universal prompt.
Step 2: Integrating MSP Process with DUO
- Login to the MSP Process portal (https://app.mspprocess.com)
- Navigate to Settings -> Integrations -> Security Integrations
- Click the Add new integration button
4. Click the DUO Web SDK button; specify a name, and then enter the Integration Key, Secret Key and API Hostname from Step #2.
5. Click Submit when you're done.
Step 3: Configuring Your MSP Process User Account To Use DUO During The Login Process
- From the MSP Process UI, click on the Profile button in the top right-hand corner of the UI
- Enable the Link DUO feature
- Follow the on-screen prompts from DUO that will link your MSP Process account to DUO
- Once you've gone through the DUO screens, and have been returned to the MSP Process UI, click Submit
Congratulations! You're Done!
You've now setup the required entities in DUO and configured MSP Process with the information it needs to start using DUO to secure the login process to your MSP Process UI.
Deploying Microsoft Authenticator via GDAP for CSP M365 Tenants Microsoft Authenticator
Introduction
Microsoft's Authenticator app is a great tool to use when verifying someone's identity through the MSP Process platform - it's more secure than just sending an SMS message, it can leverage additional biometric security mechanisms like Apple's FaceID, and it's convenient - your end-users likely already have the Microsoft Authenticator app on their phone.
In order for the MSP Process platform to send a push notification to your end-users, there are configuration steps that must be taken within that end-user's M365 tenant. This KB article will guide you through using GDAP Relationships in your CSP-model M365 tenant to complete those steps.
Prerequisites
- Your end-user's M365 tenants must have an Entra P1 license (or higher) assigned to it
- You must have the credentials for a user account in your CSP-model M365 tenant that is:
- a member of the AdminAgents group in your CSP-model M365 tenant
- Granted the Assists your customers as -> Admin agent permission in the Microsoft Partner Center:
1. Adding Groups to Microsoft Entra
You need to create three new Groups in Microsoft Entra - we suggest calling them GDAP - Application Administrator, GDAP - Privileged Role Administrator and GDAP - User Administrator - and then associate that user account mentioned in the Prerequisites section to those three Groups.
- Login to the Microsoft Entra Admin Center (https://entra.microsoft.com/)
- Navigate to Groups -> All Groups
- Click the New Group Button
- Fill in the Group details as outlined below:
- Group Name: GDAP - Application Administrator
- Microsoft Entra roles can be assigned to the group: Yes
- Click the No Members Selected link, and select the user account mentioned in the Prerequisites section
- Click Create
- Repeat steps 3 and 4 for the GDAP - Privileged Role Administrator and GDAP - User Administrator group.
2. Requesting an Admin Relationship
For each M365 child tenant that you want to deploy the Microsoft Authenticator module into, you are required to create an Admin relationship from the Admin Relationships page in Partner Center.
- The GDAP - Application Administrator Group would get assigned the Application Administrator Entra Role
- The GDAP - Priviledged Role Administrator Group would get assigned the Privileged Role Administrator Entra Role
- The GDAP - User Administrator Group would get assigned the User Administrator Entra Role
- Login to the Microsoft Partner Center (https://partner.microsoft.com/)
- Click on the Customers card
- In the menu structure on the left, click on the Administer menu item
- Click the Request Admin Relationship button
- Request a relationship that includes the Application Administrator, Privileged Role Administrator and User Administrator Entra Roles
- Enable the Auto Extend option
- Click Finalize Request to complete the Admin Relationship request
3. Associating Entra Roles with the Correct Group
Now that an Admin Relationship has been created between your CSP M365 tenant and your client's M65 tenant, you must create an association between the Group created earlier in Entra and the Entra Roles specified in the Admin Relationship.
- Login to the Microsoft Partner Center (https://partner.microsoft.com/)
- Click on the Customers card
- In the menu structure on the left, click on the Administer menu item
- Click into the client's M365 tenant
- Click into the Admin Relationship created in the last section
- Click the +Add Security Groups button
- Choose the GDAP - Application Administrator group
- Choose the Application Administrator Entra role
- Click Save
- Repeat steps 6 thru 8 for the GDAP - User Administrator group and User Administrator Entra role
- Repeat steps 6 thru 8 for the GDAP - Privileged Role Administrator group and Privileged Role Administrator Entra role
4. Obtaining the Redirect URI for the App Registration
You'll be creating an App Registration in your CSP-model M365 tenant; as part of configuring that App Registration, you'll need a Redirect URI - let's grab that from MSP Process:
- Login to the MSP Process UI (https://app.mspprocess.com)
- Navigate to Integrations -> Security Integrations
- Click the Add New Integration button
- Click on Microsoft Authenticator
- Click the CSP-model M365 Tenant button
- In the pop-up window that appears, click on the copy icon for the Link for Redirect URI parameter:
- Leave the MSP Process window open; we'll be coming back to it in just a few minutes.
5. Configuring the App Registration in your CSP-model M365 Tenant
-
- Login to your Microsoft Azure portal (https://portal.azure.com)
- Navigate to App Registrations
- Add a new App Registration, and configure it as follows (note that the URL will change, depending on the ID of your M365 integration):
- Name: MSP Process: MS Authenticator Deployment App
- Supported Account Types: Accounts in any organizational directory (Any Microsoft Entra ID tenant - Multitenant)
- Redirect URI: Web; URI: This is the URI you copied from the previous step, in MSP Process
- Click Register when you're ready.
6. Adding Permissions to the App Registration
You're going to be adding 7 permissions to the App Registration - 6 from the Microsoft Graph API, and 1 for the Microsoft Partner Center. When you're done, the permissions API permissions page will look like this:
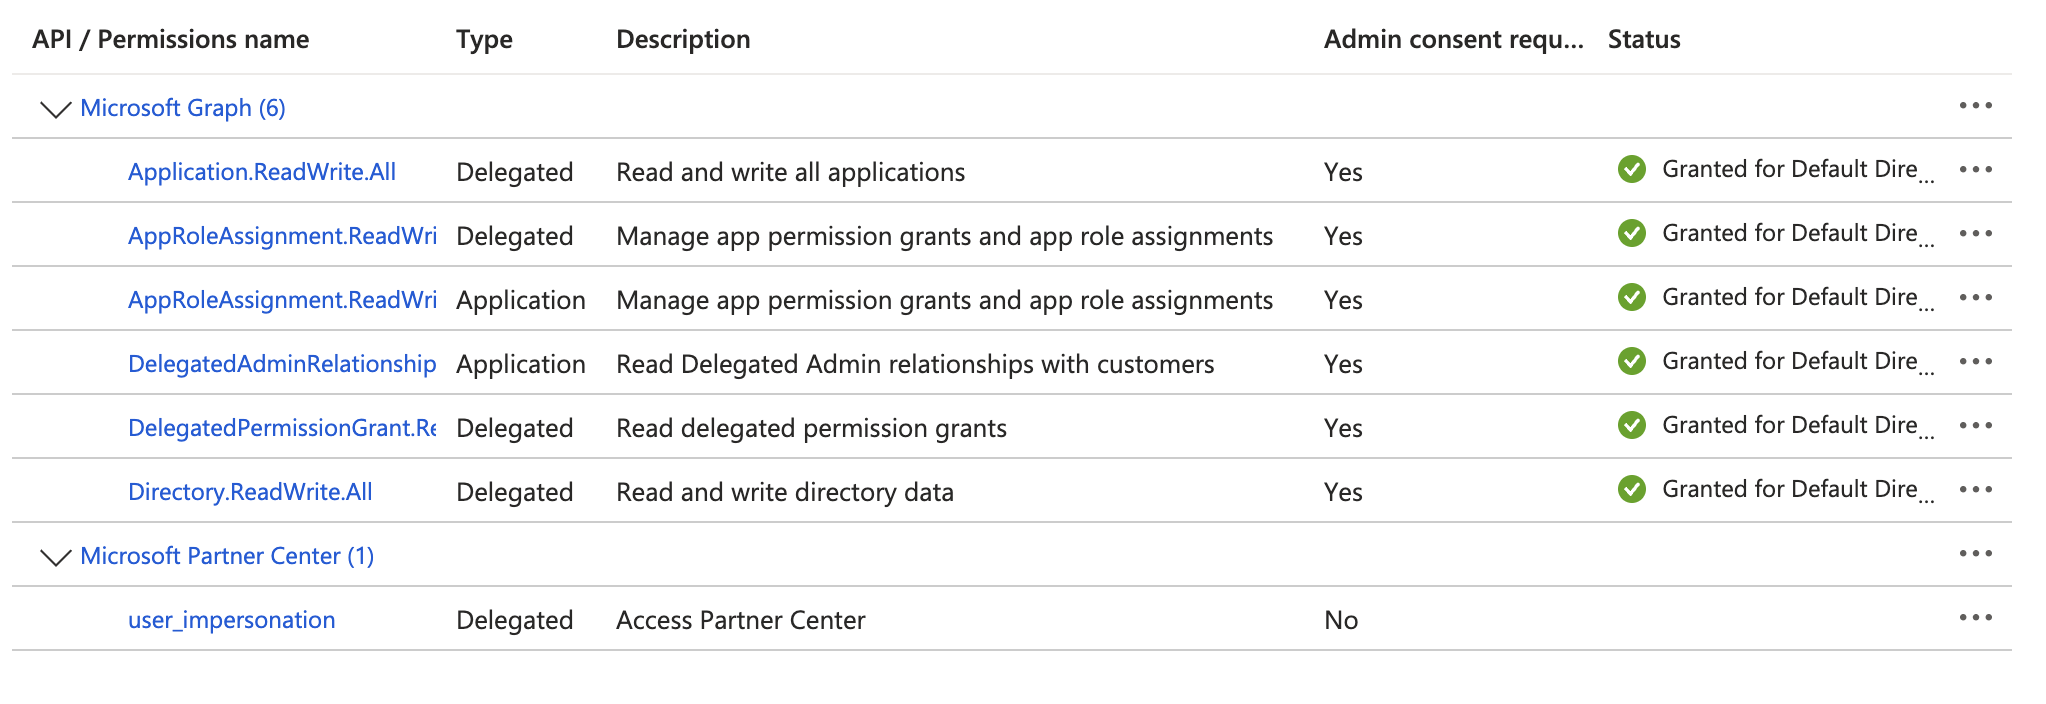
Adding the Application-level Permission
You're going to do the following steps twice - once for the AppRoleAssignment.ReadWrite.All permission, and then a second time for the DelegatedAdminRelationship.Read.All permission.
-
- Within the App Registration, go to Manage -> API permissions
- Remove the ‘User.Read’ permission
- Click the Add a permission button
- Click Microsoft Graph > Application Permissions
- Search for DelegatedAdminRelationship.Read.All, and put a checkmark beside it
- Click the Add Permissions button
-
Adding the Delegated-level Permissions
You'll complete the steps in this section 4 times - once for each of the following permissions: - - Application.ReadWrite.All
- - AppRoleAssignment.ReadWrite.All
- - DelegatedPermissionGrant.Read.All
- - Directory.ReadWrite.All
-
- Click the Add a permission button
- Click Microsoft Graph > Delegated Permissions
- Search for Application.ReadWrite.All, and put a checkmark beside it
- Click the Add Permissions button
-
Adding the Partner Center Permission
- Finally, let's add the Partner Center permission that is needed; click the Add a permission button
- Go to the APIs my organization uses tab
- Search for fa3d9a0c-3fb0-42cc-9193-47c7ecd2edbd (this is the ApplicationID of the required permission)
- Click on the resulting Microsoft Partner Center entry
- Put a checkmark beside the user_impersonation permission
- Click the Add Permissions button
-
Granting Admin Consent
- Click the Grant Admin Consent button
- Click the Grant Admin Consent button
-
7. Creating a Client Secret & Providing the App Registration Information to MSP Process
-
- Within the App Registration, navigate to Manage -> Certificates & Secrets, and add a new Client Secret.
- Copy the Value (not the Secret ID), as you'll need it in just a moment
- Back in MSP Process, fill in the rest of the fields in that Connect to Microsoft 365 (GDAP) pop-up window:
- The Domain Name of your M365 CSP tenant (this is the Primary Domain that you'd see on the Home page, in Microsoft Entra)
- The Application ID of the app you just registered; this can be found on the Overview page of the App Registration
- The Client Secret from step #17
- Click Submit
- In the Microsoft window that appears, sign-in to your CSP-model M365 tenant
- Follow the prompts to provide MSP Process with the required permissions:
- You'll be brought back to the MSP Process UI
- If you then click into the Microsoft Authenticator card, you'll see the child tenants we've been able to successfully setup:
- Within the App Registration, navigate to Manage -> Certificates & Secrets, and add a new Client Secret.
At this point, you've setup MSP Process to use Microsoft Authenticator to verify the end-users in that M365 tenant with their Microsoft Authenticator app. You'll now see Microsoft Authenticator available as an option within your PSA:
ConnectWise/Halo PSA:
Autotask:
Introduction
When an end-user calls into your helpdesk, one of the options you can use to verify their identity is to send them an end-user verification code or link through Microsoft Teams.
In order to send the verification code or link through Microsoft Teams, you must first customize the MSP Process Teams bot, and then deploy it to your client's Microsoft Teams environment.
Customizing the MSP Process Teams Bot
- Login to the MSP Process UI (https://app.mspprocess.com)
- Navigate to the AI Service Desk -> Client Portal -> Teams Bot Configuration page
- Configure the Bot so that it has your logo, is named appropriately (so that you your customers will understand who the messages are coming from), and has an appropriate description:
- NOTE: For optimal readability, the logo you upload should be 192 x 192 pixels
- When everything has been configured, click the Get Zip File button
Deploying the Bot for Testing Purposes, to One User
You may wish to test out how the MSP Process Teams bot looks by first making it available in your own MS Teams environment. This can be done for a single user, allowing you (the user) to test things out before deploying it to your customers.
Source: These instructions come from a Microsoft KB article (here)
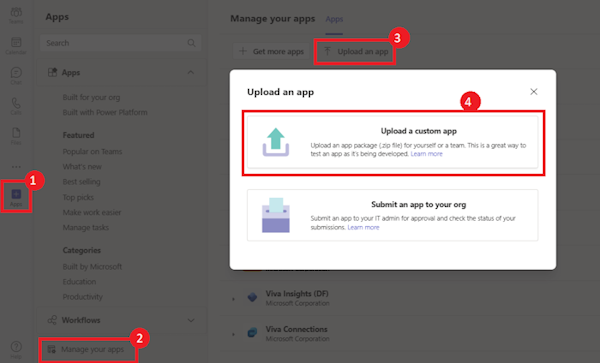
To upload the app to Teams
-
In the Teams client, select the Apps icon.
-
Select Manage your apps.
-
Select Upload an app.
-
Look for the option to Upload a custom app. If the option is visible, custom app upload is enabled.
Note: Contact your Teams administrator, if you don't find the option to upload a custom app.
-
Select Open to upload the .zip file that you created earlier.
-
Click Add.
-
Select Open to use the app in personal scope.
Alternatively, you can either search and select the required scope or select a channel or chat from the list, and move through the dialog to select Go.
Congratulations! You have now deployed your MS Teams bot into your MS Teams environment, and you've made it available for testing purposes.
Deploying the MSP Process Teams Bot to a Client's Microsoft Teams Environment
- Login to the Microsoft Teams Admin Center, and navigate to Teams Apps -> Manage Apps (Direct Link: https://admin.teams.microsoft.com/policies/manage-apps)
- Click on Actions -> Upload new app
- Click the Upload button to upload the .zip file that you created earlier.
- Once the app has been uploaded, navigate to Teams Apps -> Setup Policies
- Click the Add button to create a new policy
- Give this app policy an appropriate Name and Description
- In the Installed Apps section, click the Add apps button, and choose your MSP Process Teams bot
- Click Save
- Click on the Group policy assignment tab
- Click the Add button, and assign your app policy to the appropriate list of end-users (in this example, I'm assigning the app to everyone)
That's it! You've now deployed your customized version of the MSP Process Teams bot to your client's Microsoft Teams environment.
Sending End-user Verification Codes/Links through Microsoft Teams
Now that you've deployed your customized version of the MSP Process Teams bot to your client's Microsoft Teams environment, you can start sending them end-user verification codes or links. For ConnectWise, HaloPSA, SuperOps.ai, Syncro or Zendesk partners, you'll click on the red shield beside the user's e-mail address:
You'll then be able to send that end-user either a code or a link through Microsoft Teams by clicking the apporpriate button:
For our Autotask partners, you'll see the two new Teams-related options (Teams Code and Teams Link) in the Verification feature, in the drop-down menu:
Upgrade Demo account to a Paid account General Support
Go to Account Settings -> Billing as shown below and click on the edit button.
Select the plan you'd like to upgrade to on the left side and then fill out the information on the right. Be sure to include a Dealer code if you have been given one by the team.
Client Portal User Permissions Client Portal
Introduction:
There are 4 roles you can assign to a Client Portal user: User, Accounting User, Manager and Admin. This KB article outlines the differences between those roles, and how you can change the role of a Client Portal User.
Role Details:
| Role | Can View Their Tickets | Can View the Chats Tab | Can View Tickets Across Multiple Companies | Can View Other User's Tickets | Can View the Invoices Tab | Can View Invoices Across Multiple Companies |
| User | Yes | Yes | No | No | No | No |
| Accounting User | Yes | Yes | Yes | No | Yes | Yes |
| Manager | Yes | Yes | Yes | Yes | Yes | No |
| Admin | Yes | Yes | Yes | Yes | Yes | Yes |
Assigning a Role to a Client Portal User:
- Navigate to Client Portal -> Portal Users
- Select your Client Portal configuration from the drop-down menu
- In the Actions column, click the pencil icon
to edit the Portal User
- In the Role drop-down menu, choose the Role you want to assign to the user
- Click the Update button
Setting up AI VoiceAssist AI VoiceAssist
Requirements:
- An Admin-level account in MSP Process
- A "escalation" phone number you plan on giving to the AI VoiceAssist, so that it can escalate callers to a live agent
Configuring AI VoiceAssist:
- Login to the MSP Process UI (https://app.mspprocess.com) with an Admin-level account
- In the left-hand menu, click on AI Service Desk > AI VoiceAssist > AI Configurations
- Click the Add New button
- Fill in the required fields on each tab; note that the Incoming Phone Number is one that you can choose with an MSP Process team member, so that it's in your area code, or matches a sequence that you prefer. Contact us at help@support.mspprocess.com to get that setup for you.
- Click the Create button to save your AI VoiceAssist configuration
What Do Those AI VoiceAssist Options Do?
Agent Details
- The Agent Name and Company Name options let you customize how the AI refers to itself and your company. For example, you can have it say "Hi there, it's James Bond from GoldenEye; how can I assist you today?"
- The Gender option lets you configure whether your AI VoiceAssist agent speaks with a female voice or a male voice
- The Language option lets you choose what accent your AI VoiceAssist agent speaks with, and what languages it can understand and communicate in.
Opening/Closing Messages
- The Greeting and Closing messages let you customize how your AI VoiceAssist agent begins and ends the call
- You can use the following variables:
-
${firstName}– caller’s first name -
${companyName}– your company name -
${agentName}– the AI VoiceAssist agent's name
-
- Within these messages, in order to ensure best performance, we recommend keeping them to a maximum of 3-4 sentences. If you are looking for assistance with this, please reach out to the team and we are happy to assist with providing some examples of prompting with proven success.
On-Call Behaviors
- The Agent Type option lets you choose how much troubleshooting you want the AI to perform:
- Level 1 doesn't ask any troubleshooting questions
- Level 2 asks some basic troubleshooting questions, such as "when did this issue start?", "what have you done to try to resolve the issue?" and "how is this impacting your business?"
- Level 3 provides issue-specific troubleshooting steps, and will try to resolve the problem mentioned by the caller
- The End-user Verification option allows you to control whether or not the AI VoiceAssist agent verifies the identity of the caller. AI VoiceAssist can use Microsoft Authenticator, Duo, or a link sent as a text message to verify the caller. There are 3 options to choose from if enable this feature:
- Verify the caller on every call
- Verify the caller before transferring to a live agent
- Verify the caller if they are asking about an existing ticket
Call Transferring
- The Fallback Phone Number allows you to specify what number we should transfer the call to, in the event that the AI VoiceAssist infrastructure experiences an issue handling the call, ideally this is a number outside of the call flow which transfers to the agent to avoid transfer looping.
- The Allow Transferring The Call to a Live Agent option controls whether or not the AI VoiceAssist agent will transfer the call:
- If enabled, the AI VoiceAssist agent will transfer the call if the caller requests to speak to a live agent, or if the problem mentioned by the caller is deemed serious enough to warrant speaking to a live agent
- If disabled, the AI VoiceAssist agent will never transfer the call - regardless of the issue being mentioned by the caller, if the caller is angry, or if the caller asks to speak to a live agent.
- The Warm Transfer feature, when enabled, will speak with your technician when transferring the caller over, and let your technician know the caller's name, the ticket ID, and the nature of the problem.
- The Call Transfer Phone Number is the default phone number to which the call will be transferred.
- The Call Transfer Phones feature allows you to specify up to 10 additional phone numbers to use for transferring the call, and also allows you to add sentences to tell the UI when to transfer the call to which phone number. (Ex. Transfer to this number when issues require escalation to a Tier 3 Technician)
- The Transcribing the Post-transfer Call feature will transcribe the call between the caller and your technician, and then add that transcription as a Time Entry (if the ticket is assigned to a technician) or a Ticket Note.
Ticket Triage
The Ticket Triage feature supports Autotask, Connectwise and Halo PSA. When enabled, it will - after the call is completed - analyze what the call was about, and then modify the Priority, Ticket Type and Ticket Sub-Type, when applicable.
Ticket/Email Outputs
- The Ticket/Email Outputs tab lets you choose whether you want a ticket to be created at the end of the call, or if the transcript of the call should be sent to an email address. When configured to create a ticket, the Ticket Properties option let you pick a Ticket Default, which controls the properties of the tickets that will be created in your PSA, such as the Board/Queue, Priority, Source, and more! Ticket Defaults are configurable from the AI Service Desk > Ticketing > Ticket Properties page.
Roles and Permissions in MSP Process Account Management and Security
Roles:
There are two Roles in MSP Process - Admin, and Technician. By default, users who are invited to the platform are given the Technician role. Here are the differences between the two Roles:
| The Admin Role... | The Technician Role.... |
|
|
Permissions:
There are two permissions that can be applied to any User in MSP Process, regardless of what Role (Admin or Technician) they have been assigned:
- The Use MFA option forces that user to setup MFA
- The Allow Access to UI option offers you two choices:
- If Disabled, the user can only login to the ConnectWise/Halo/Autotask pod, and cannot login to the main https://app.mspprocess.com website
- If Enabled, the user can login to both the ConnectWise/Halo/Autotask pod and the main https://app.mspprocess.com website
Editing The Roles/Permissions of a User:
To edit a user's Role, or the Permissions assigned to that user, navigate to the Teams -> Users page, and in the Actions column click the pencil icon for that user:
You'll then be presented with a screen that will allow you to edit that user's Roles and Permissions:
Syncing Contacts with Microsoft 365 (One M365 Tenant at a Time) How to Articles
Introduction
The MSP Process platform can sync contacts from a variety of sources, including many common PSA platforms in the MSP market. Some MSPs don't use a supported PSA though - for example, they use an uncommon PSA, or they've built their own, homegrown solution. In other cases, Microsoft 365 is the "source of truth for a Contacts", and the PSA is downstream/synching contacts from Microsoft 365, so it makes sense to directly update those contacts in Microsoft 365, instead of in the PSA.
In those scenarios, MSPs can configure the MSP Process platform to directly sync Contacts with the end-user's Microsoft 365 contacts - allowing the MSP to leverage the End-user Verifcation, Secure Data Send, and Broadcast messaging features that are built into the platform.
NOTE: This KB article deals with linking MSP Process to one M365 tenant at a time. To link MSP Process to all of your M365 tenants, using the Admin relationships you've setup in the Microsoft Partner Center, please refer to this KB article.
Linking MSP Process with Microsoft 365
- Login to the MSP Process UI (https://app.mspprocess.com) as an Admin-level user
- Navigate to the Settings -> Integrations -> PSA Integrations menu
- Click the Add button
- Click on the Microsoft 365 option
- Specify a name for the integation, and click the Submit button
- Click on the Microsoft 365 card that is now listed on the PSA Integrations page
Configuring the M365 Integration on a Tenant-by-Tenant Basis
- Click the Connect to Microsoft 365 button to link MSP Process to a Microsoft 365 tenant
- Follow the Microsoft UI flow to deploy the MSP Process app
- Click the Sync Companies button, and then the Sync Users button
- You're done! Repeat with any other Microsoft 365 tenants that you want to link to the MSP Process platform.
Interacting with Microsoft 365 Contacts in the MSP Process UI
Once you've integrated MSP Process with one or more Microsoft 365 tenants, you can view those Contacts from the Contacts menu:
From the Contacts page, you can view the Mobile Number and E-mail address of each contact. From the Actions column, you can open the MSP Process Pod, which will allow you to perform End-user Verification, securely send your customers data, and respond to Technician Verification requests.
Sending E-mails through an M365 Shared Mailbox How to Articles
Introduction:
By default, any e-mail sent by the MSP Process platform comes from noprely@mspprocess.com. For e-mails that are sent internally to an MSP, such as invites for technicians to join the MSP Process platform, this is a perfectly acceptable thing, but it's not ideal when dealing with e-mails that are sent to end-users, such as Opt-in forms and End-user Verification e-mails.
The MSP Process platform can be configured to send all of it's end-user facing e-mails through a Microsoft 365 shared mailbox - making it easy for any Partner to send our e-mails from a trusted Sender address of their choosing.
Configuring MSP Process to use a Microsoft 365 Shared Mailbox
- Login to the MSP Process UI with an Admin account
- Navigate to the Settings -> Account Settings -> Outgoing Mail page
- Click the Start Setup button
- Login to the Microsoft 365 tenant that owns the Shared Mailbox you wish to use
- Approve the deployment of the MSP Process "Outbound Mail Module" application
- You're now able to choose which mailbox you wish to use:
- Click the Submit button to finish the setup process
Testing the Shared Mailbox Configuration
- From the Settings -> Account Settings -> Outgoing Mail page, click the Test button
- You'll be brought to the Settings -> Account Settings -> Test E-mail page
- Choose the "Opt-In Letter" as the e-mail to be sent, and specify the recipient's e-mail address
- Click the Test button to send out the test e-mail
- Confirm that the recipient received the e-mail, and that the Sender address is the Shared Mailbox
Deleting a Shared Mailbox Configuration
- Navigate to the Settings -> Account Settings -> Outgoing Mail page
- Click the Delete button
E-mails that are sent through an M365 Shared Mailbox:
- Opt-in forms
- End-user verification - both codes and secure links
- Secure Data Send e-mails
- Invitations to the Client Portal
E-mails that are not sent through an M365 Shared Mailbox:
- Invites to join the MSP Process platform (sent via the Settings -> User Management-> Invite Users page)
- Password reset e-mails
- E-mails from the "Notifications" module
Zendesk Integration Setup Zendesk
Login to your Zendesk admin portal and create an API token as shown below:
Give the API Key a name and click Copy.
Login to MSP Process and Click on Integrations -> PSA Integrations. Click the Add PSA button.
Click on Zendesk
Give the integration a Name, put in the URL for your Zendesk site and the API key and click Submit.
The next screen select your ticket defaults and click Submit.
Creating a Microsoft Teams Connection How to Articles
Introduction:
Several features in the MSP Process platform can send messages to Microsoft Teams channels:
- When a new text message is send to an SMS number
- When a new Live Chat is created
- When a new Client Portal chat is created
The goal of this KB article is to walk through how to setup a Workflow in Microsoft Teams that can accept the messages from the MSP Process platform, and to configure MSP Process so it knows about the Microsoft Teams channel.
Creating a Workflow in Microsoft Teams:
In the Microsoft Teams app, launch the Workflows feature by clicking on the ... menu item, and searching for "Workflows":
- In the Workflows app, click the
button
- Click the
button
- Create a workflow that looks like this:
Here's what the Parse JSON action should look like:
And here's the text that goes in the Schema field:
{
"type": "object",
"properties": {
"text": {
"type": "string"
}
}
}
Finally, here's how the "Post message in a chat or channel" action is configured:
Configuring a Microsoft Teams Connection in MSP Process:
- Login to the MSP Process UI (https://app.mspprocess.com) as an Admin-level user
- Navigate to the Settings -> Account Settings -> Teams Connections page
- Click the Add button:
- Fill in the two required fields:
- Give the connection a name
- In the URL field, paste the URL from the Microsoft Teams workflow - the URL can be found in the When a Teams webhook request is received action:
- Click the Test button to ensure that the connection to your Microsoft Teams workflow is correctly setup - you should see the message "Hello, World" in the Microsoft Teams channel you specified in the Workflow.
- Click the Submit button to save the connection
End User Verification Video - ConnectWise Pod General Support
Using DUO's "Traditional" Login Prompt Account Management and Security
Context:
Recent changes made by DUO have made it so that their Universal Prompt cannot be rendered in an iframe. The main UI of the MSP Process platform is not affected by this change, but our PSA-embedded Pod (ConnectWise and Halo PSA) and Insight (Autotask) are affected, as they are iframes within the UI of those PSA platforms.
This KB article guides you through how to change your DUO configuration for MSP Process to use DUO's "traditional" prompt, which will allow you to continue to securely login to the MSP Process Pod/Insight when you've chosen to use DUO as your MFA provider.
Instructions:
- Login to your DUO admin panel (the URL will be something like https://admin-.duosecurity.com/ )
- Click on the Applications menu
- Find the Web SDK entry for MSP Process, and edit it
- Under the Universal Prompt section, choose the Show traditional prompt option
- At the bottom of the page, click the Save button
Conclusion:
You've now successfully configured your DUO tenant to use their traditional promp for the MSP Process platform. You'll find that your login experience does look different, as DUO's traditional prompt has a different look and feel:
Introduction:
Setting up the integration between Synco and MSP Process is quick and easy; you'll be completing the following steps:
- Creating an API token in Syncro
- Creating a PSA integration in MSP Process, and configuring that PSA integration to use that API token
Creating an API token in Syncro
- Login to your Syncro account
- Click on the Admin button that's on the right-hand side of the menu bar
- At the very bottom of the page, under the API section, click on API Tokens
- Click the New Token button
- On the Custom Permissions tab, specify the following permissions:
- Click the Create API Token button
- Copy the API Token; you'll be providing it to MSP Process in the next section
- Click Done when you're ready to proceed
Configuring MSP Process to Communicate with Syncro
- Login to the MSP Process UI (https://app.mspprocess.com)
- Navigate to the Integration -> PSA Integration page
- Click on the Add new PSA button
- Choose Syncro
- Fill in the fields - the domain of your Syncro environment and the API Token from the earlier part of this KB article
- Click Submit when ready
- Fill in the Ticket Default values; a Ticket Default is used when MSP Process creates a ticket in Syncro
Congratulations! You've now successfully integrated MSP Process with your Syncro environment.
Modifying a user's Default Sign-in Method in M365 to be "Microsoft Authenticator" Microsoft Authenticator
Introduction:
When you send a verification request to someone's Microsoft Authenticator app, you may see an error message in MSP Process saying that the user has a different "Default Sign-in Method" specified.
In this situation, the user will not receive your verification request as a push notification in their Microsoft Authenticator app.
The goal of this KB article is to show you where in M365 you can go to modify a user's default sign-in method.
Steps to resolving the Error:
- Login to the Microsoft Entra admin center (https://entra.microsoft.com/?l=en.en-us) as a user who has the rights need to modify someone's identity in Entra
- Navigate to Protection -> Authentication methods
- Under the Monitoring section, click on User Registration Details
- Click on the user who's preferred authentication method you want to modify
- In the MFA Status card, click on Manage MFA Authentication methods
- Click on the pencil icon that allows you do edit the Default sign-in method
- Choose Microsoft Authenticator from the drop-down menu
- Click the Save button, and you're done!
Step 1: Creating an API User in Kaseya BMS Kaseya BMS
Introduction
Configuring the MSP Process platform to work with your Kaseya BMS server is a two-step process; first you need to create an API user in Kaseya BMS, and then you need to provide the API User's credentials to the MSP Process platform. This KB article will cover the first step; the second KB article is available here.
Creating a Custom Role for the API User
- Navigate to Admin -> Security -> Roles
- Click the New (
) button to create a new Security Role
- Name the role something that's easily understood, such as "MSP Process API User"
- Ensure that the Role Type is set to Internal, and the Status is set to Active
- Click the Save (
) button to save the Security Role
- In the Service Desk category, click the Allow View All and Allow Modify All buttons
- In the CRM category, enable the View permission for Accounts and both View and Modify for Contacts
- Click the Save (
Creating an API User in Kaseya BMS
Note: these instructions were sourced from this Kaseya BMS KB article.
- Login to your Kaseya BMS server
- Navgiate to Admin -> HR -> Employees
- Click the New (
- User Name: MSPProcessAPIUser
- First Name: MSP Process
- Emp ID: Whatever number makes sense for your organization
- Email Address: mspprocessAPIUser@.com (note that you'll need this to be a valid e-mail whose inbox you can access)
- Job Title: Administrator
- Department: Administration
- Manager: Pick an appropriate Manager within your organization
- Employment Type: Full Time
- Employee Roles: Administration
- Security Roles: Choose the Security Role that you created (i.e. MSP Process API User)
- Location: Pick an appropriate location
- User Type: Api Employee
- Click the Save (
)button to save the new user
- Edit the user account, and click the Reset and Send Instructions button; when you receive that e-mail, change the password and save it, as we'll need the e-mail address of the user and the password in the second KB article.
Conclusion
Congratulations! You've now created a custom Security Role and an API user in Kaseya BMS, and you're ready to following the instructions in our second KB article, available here.
Introduction:
This is the second (of two) KB articles that guides you through configuring the integration between Kaseya BMS and the MSP Process platform. The first KB article is available here; the steps in that article must be completed before following the instructions in this KB article.
Providing MSP Process with the API User Credentials from Kaseya BMS
- Login to the MSP Process UI (https://app.mspprocess.com)
- Navigate to Integrations -> PSA Integrations
- Click the Add new PSA button
- Click the Kaseya button
- On the first step of the wizard (Select PSA) enter the required information - specify the e-mail address and the password for the user that you created in Kaseya BMS
- Click Submit; this will validate that the MSP Process platform can communicate with your Kaseya BMS instance
- On the second step of the wizard (Input base settings), specify the properties for any new tickets that get created through MSP Process
- Click the Validation button, and then the Submit button
Congratulations! You've now configured the integration between MSP Process and your Kaseya BMS instance.
Introduction
Configuring MSP Process and HaloPSA to work with one another is a quick and easy process that is composed of a few steps:
- Creating an Agent in HaloPSA that has the appropriate roles and permissions.
- Creating an Application within the HaloPSA API
- Providing MSP Process with the appropriate URL and tokens to communicate with HaloPSA.
- Creating a custom tab in HaloPSA that will display the MSP Process Pod
Once you've completed the steps in this KB article, you'll have MSP Process and HaloPSA communicating with one another, and you'll be ready to move on to the next KB article: Step 2: Setup the MSP Process "Custom Tab" in Halo.
Creating an Agent in HaloPSA
- Sign into your HaloPSA system
- Navigate to Configuration -> Teams and Agents -> Agents
- Click the New button to add a new agent
- Provide a name for the agent; we recommend MSP Process Agent
- Specify a password that meets your organizations security rules
- Assign the agent a Role; we recommend the default Role called 1st Line Support (or your equivalent if you’re modified the Roles in your Halo PSA instance). The Role you assign must have the following permissions enabled:
-
- Ticket Access Level: Read and Modify
- Customer Access Level: Read and Modify
- User Access Level: Read and Modify
- CRM Access Level: Read-only
- Assets Access Level: Read and Modify
Ticket Permissions
- Can add new tickets: Yes
- Can edit closed tickets: Yes
- Can view unassigned tickets: Yes
- Can view Tickets that are assigned to other Agents: Yes
- Can Re-assign Tickets: Yes
- Editing of Actions: Can Edit Own Actions Only
- Can Edit Tickets Which Are Not Assigned To Them: Yes
-
- Enable the Is an API-only agent option
- Fill out any other mandatory fields (such as the Team and Working Hours fields)
- Click Save
- Edit the MSP Process Agent account; on the Permissions tab, enable the "Can Delete Tickets" option:
- Click Save
NOTE: The ability to delete tickets is only needed when setting up a Ticket Default in MSP Process, as validating the Ticket Default involves creating and then deleting a ticket in Halo PSA. Once the ticket default has been setup, you can disable the "Can Delete Tickets" option.
Creating an Application within the HaloPSA API
- From the Halo PSA UI, navigate to Configuration -> Integrations -> HaloPSA API
- Take note of the Resource Server URL; you'll need it (including the https:// prefix, but without the /api at the end) during one of the configuration steps with MSP Process
- Within the Applications portion of the page, click the View Applications button
- Click the New button to add a new application
- Specify a name for the application; we recommend MSP Process
- Within the Authorization Method section, select Client ID and Secret (Services)
- Copy the ClientID and Client Secret; you'll need it during one of the configuration steps with MSP Process
- Ensure that the Login Type drop-down menu is set to Agent
- Open the Agent to log in as drop-down menu, and choose the Agent you configured in the Creating an Agent in HaloPSA section
- Click the Save button
- Dismiss any permissions-related messages that appear; we'll be configuring those next
- On the Permissions tab, click the Edit button and enable the following permissions:
- read:tickets
- edit:tickets
- read:customers
- edit:customers
- read:crm
- edit:crm
- read:items
- edit:items
- Click the Save button
Providing MSP Process with the appropriate URL and tokens to communicate with HaloPSA
- Login to the MSP Process UI (https://app.mspprocess.com)
- Navigate to Integrations -> PSA Integrations
- Click on the Add new PSA icon
- Click the HaloPSA icon
- Specify the ClientID and Secret that you obtained in step 7 of the Creating an Application within the HaloPSA API section
- Specify the Resource Server URL (remove the /api at the end) that you obtained in step 2 of the Creating an Application within the HaloPSA API section. Note that the URL must start with https://
- Click Submit to save the HaloPSA configuration settings
- Finally, fill in the ticketing default fields; these values will be used when leveraging MSP Process to create tickets
- Click Submit to finish setting up the HaloPSA module in MSP Process
Deploying the Microsoft Authenticator Module to a Specific M365 Tenant Microsoft Authenticator
Introduction
Microsoft's Authenticator app is a great tool to use when verifying someone's identity through the MSP Process platform - it's more secure than just sending an SMS message, it can leverage additional biometric security mechanisms like Apple's FaceID, and it's convenient - your end-users likely already have the Microsoft Authenticator app on their phone.
In order for the MSP Process platform to send a push notification to your end-users, there are configuration steps that must be taken within that end-user's M365 tenant. This KB article will guide you through those steps.
Prerequisites
- Your end-user's M365 tenant must have an Entra P1 license (or higher) assigned to it
- You must have a set of credentials for your customer's M365 tenant that have Cloud Application Administrator permissions.
Configuring an M365 Tenant
The following steps must be done for each M365 tenant.
- Login to the MSP Process UI (https://app.mspprocess.com)
- Navigate to Integrations -> Security Integrations
- Click the Add New Integration button
- Click on Microsoft Authenticator
- In the Microsoft window that appears, sign-in to your customer's M365 tenant
- Follow the prompts to provide MSP Process with the required permissions
- ; when that's completed, you'll be brought to the following page:
- Click the Tap to finish onboarding button
- You'll be brought back to the MSP Process UI
At this point, you've setup MSP Process to use Microsoft Authenticator to verify the end-users in that M365 tenant with their Microsoft Authenticator app. You'll now see Microsoft Authenticator available as an option within your PSA:
ConnectWise/Halo PSA:
Autotask:
Step 1: Setup the API User in Autotask and Configure the Autotask Integration in MSP Process Autotask
Login to Autotask and create your API username and password:
Under Admin -> Resources (Users) click on New and select "API User", Select MSP Process as your integration partner, and generate a username and password. These two fields will be the username and password you will use to connect Alert Manager to Autotask.
 Select Security Level "API User" (system)
In MSP Process click on Integrations -> PSA Integrations and click on the Add new PSA button:
Click on Autotask:
Input the username (key) and password (secret) from the steps above:
The Store Contacts in MSP Process feature is optional; it is used for two things:
- If you have a lot of contacts in Autotask, enabling the Store Contacts in MSP Process feature is recommended but optional, as it'll ensure that the Contacts page in MSP Process will load quickly. With contact storage disabled, we'll live query Autotask for your list of Customers and Contacts each time you load the Contacts page in MSP Process, which can take anywhere from 5 to 60 seconds to complete. No one likes waiting. =)
- If you plan on using the AI VoiceAssist module, enabling the Store Contacts in MSP Process feature is mandatory, as we need that information readily accessible, so that we can quickly identify the caller.
NOTE: This is the second (of two) steps needed to configure the Autotask integration. If you haven't already done so, please complete the first step, which is available here:
Setup the API User in Autotask and Configure the Autotask Integration in MSP Process
Configuring the MSP Process Insight in Autotask
In the menu select Admin → Extensions & Integrations
At the Vendors tab, find ‘MSP Process’ in the Vendor Name column and click ‘Edit’
The ‘Active’ checkbox must be checked.
Enable the two options in the "Vendor Insights" section, and press ‘Save & Close’
Then go to Admin -> Features & Settings
Select the Ticket Category which you use as Default - in most cases that's the one called "Standard", and Edit this default ticket category.
Open the Insights tab
This page is divided into two sections - Visible Insights and Hidden Insights. You'll find the MSP Process insight in the Hidden section; drag it up to the Visible section, and place it in the apporpriate order with the other Visible insights. Insights in the "Hidden Insights" section will not display on the Ticket. The "Always Display" checkbox should be checked.
After pressing ‘Save & Close’ you will be able to see the MSP Process insight in the Insights section of your Tickets.
Mobile Apps - for Technicians and End-Users Client Portal
Introduction
The Client Portal feature within the MSP Process platform is feature-rich and intuitive to use, but did you also know that it's available as a mobile app? We've built two different apps for the Client Portal - one for your Technicians, and another for your End-Users. Let's take a look!
Technician App
The Technician app is available for both iOS and Android, from the following URLs:
iOS: https://apps.apple.com/us/app/msp-process/id6447599630
Android: https://play.google.com/store/apps/details?id=vn.starlingtech.likemagic
The app allows your Technicians to chat with end-users, view their tickets, add ticket notes, and more!
End-User App
The End-User app allows your customers to create and update tickets, chat with your Technicians, request a Technician Verification, and get notifications. The app is branded with your MSP's logo and colors, enhancing the visibility of your brand to your customers.
iOS: https://apps.apple.com/us/app/msp-client-portal/id6469681233
Android: https://play.google.com/store/apps/details?id=com.app.mspclient
Free Plan Onboarding - Autotask Free Plan Onboarding
Login to Autotask and create your API username and password:
Under Admin -> Resources (Users) click on New and select "API User", Select MSP Process as your integration partner, and generate a username and password. These two fields will be the username and password you will use to connect Alert Manager to Datto Autotask.
Select Security Level "API User" (system)
In MSP Process click on Integrations -> PSA Integrations and click on Plus sign on Add as shown below:
Click on Autotask and then input the username and password from the steps above:

The following is the setup process for the Autotask Ticket Insight. This must be completed after setting up the API and putting it API keys into app.mspprocess.com.
Configuring the MSP Process Insight in Autotask
In the menu select Admin → Extensions & Integrations
At the Vendors tab, find ‘MSP Process’ in the Vendor Name column and click ‘Edit’
‘Active’ checkbox should be checked.
Enable Vendor Insights and press ‘Save & Close’
Then go to Admin -> Features & Settings
Select ‘Ticket Categories’
Select ‘Ticket Category’ which you use as Default and Edit this default ticket category.
Open ‘Insights’ tab
Drag and drop the insights within the "Visible Insights" section to control their order of appearance on the Insights tab. Insights in the "Hidden Insights" section will not display on the Ticket. The "Always Display" checkbox should be checked.
After pressing ‘Save & Close’ you will be able to see POD in Ticket window.
Free Plan Onboarding - HaloPSA Free Plan Onboarding
The first thing that you be required is the create the HaloPSA API keys.
1) Choose the configuration gear,
2 Choose HaloPSA API.
3) Now grab the URL for your Halo instance under Resource Server - copy this and have it available to put into the app.mspprocess.com configuration. Only the first component until the end of the domain name is required.
4) Finally, click on the View Applications button.
/>
Save the Resource Server to a notepad or another place for retrieval later.
Click on New on the top, right-hand side to create a new API
Follow these steps:
1) name the Application (MSP Process, in this case or something similar),
2) Choose Authentication Method (Client ID and Secret - these will be provided to the integration step in app.mspprocess.com from above)
3) Copy and Paste the Client Id for later retrieval onto a clipboard or other for later retrieval to put in app.mspprocess.com
4) Copy and Paste the Client Secret onto a clipboard or other for later retrieval to put in app.mspprocess.com
5) "Agent to log in as" should choose an Agent with admin privileges and
6) Save
Click on Permission Tab. Edit the permissions. And click on the ones identified below. Make sure the final step is the Save the permission Changes.
At this point, you are ready for onboarding with your specialist. Make sure you have your Resource Server, Client Secret and Secret ID obtained earlier. These will be required for input into app.mspprocess.com integration page.
Once you have done the integration with you have completed the API integration with your onboarding specialist, you will have to complete the HaloPSA configuration:
Now we are going to create a Custom Tab in Halo. So go to Halo and under Configurations -> Custom Tabs, with the Entity set to "Ticket", click on "New" to create a new Custom Tab.
Enter the name of the custom tab to something like: "MSP Process", Sequence "2" (or wherever you want it to appear), Type "Iframe", and finally, paste the URL that you copied from the app.mspprocess.com integration page, and hit Save.
For each ticket type that you would like for the MSP Process functionality to appear as a Custom Tab, you have to follow the following process:
Under the Halo Configuration-> Ticket -> Ticket Types, choose the ticket type that you would like to configure. Incident in this example.
Edit the Ticket Type, in this case, Incident, under the item Custom Tabs, make sure the box "All all Custom Tabs" is turned on. Save the configuration.
At this point, please contact your MSP Process account manager or onboarding specialist. You will be required to put the Resource Server, Client ID and Secret into the MSP Process application please have this data ready for the onboarding session.
Once the previous step is completed, you will have access to the MSP Process custom tab when you access a ticket (on an Incident ticket in this case) on your HaloPSA!
Free Plan Onboarding - Connectwise Free Plan Onboarding
Login to ConnectWise as an Admin and select System -> Members -> API Members as shown below:

Click on + as shown below:

Fill out all required fields and click Save button: Be sure to set the permission to "Admin". If you have a role ID other than Admin, please see the bottom of this documentation for setting permissions for a custom role ID.
Click on API Keys and then click on the + sign to add a new key:

Give it a description and click Save:
The keys will disappear after you click save and close so copy both now to a document or directly into MSP Process before you save and close in ConnectWise.
After you have saved the Public and Private keys to a clipboard or anywhere else for retrieval, the next step will be to enter this information into the MSP Process admin app. On your Onboarding session, please make sure to have these available.
Once instructed by your onboarding specialist, please perform the following tasks:
Now login to MSP Process and click on Integrations and click Integrations -> PSA Integrations. Click + to Add PSA and select ConnectWise.
Select ConnectWise
Enter your PSA Connection Details:
ConnectWise Permission Details
Introduction
At MSP Process we believe in only setting the minimum permissions required to leverage our application for your business needs. Please find the outline below along with a more granular review of the permissions.
Adding a Security Role for MSP Process
- Login to your ConnectWise Manager account
- Navigate to System -> Security Roles
- Add a new role, name it MSP Process, and give it the permissions listed below:
| Area | Permission | |
| Companies |
Company Maintenance: Inquire (All) Company/Contact Group Maintenance: Inquire (All) Contacts: Add/Edit/Inquire (All) CRM/Sales Activities: Inquire (All) Manage Attachments: Add/Inquire (All) Notes: Add/Edit/Inquire (All) Team Members: Inquire (All) |
|
| Finance* | Invoicing: Inquire (All) | |
| Project | Project Tickets: Inquire (All) | |
| Service Desk |
Close Service Tickets: Add/Edit/Inquire (All) Resource Scheduling: Add/Inquire (All) Service Ticket - Dependancies: Add/Edit/Inquire (All) Service Tickets: Add/Edit/Inquire (All) Service Tickets - Finance: Inquire (All) SLA Dashboard: Inquire (All) Ticket Templates: Inquire (All)
|
|
| System |
Member Maintenance: Inquire (All) Table Setup: Inquire (All) |
* only required if using the Invoices tab within the MSP Process Client Portal
4. Within the System area, click the customize link beside the Table Setup permission (screeshot below):
5. Make sure that all of the entries are "allowed access" as shown below. You may then save and close the MSP Process Security Role.
API Endpoints Used by MSP Process
This is a list of all APIs we get information from or post using the API connections. Please adjust your permissions based on the details below. Please note that some of these API requests are part of other functions of our app and are not needed for End User and SMS utilization.
|
Type |
API (resource) |
Description |
|---|---|---|
|
GET |
|
Check is connection is valid |
|
GET |
|
Get statuses (company filters) |
|
GET |
|
Get types (company filters) |
|
GET |
|
Get statuses (configuration filters) |
|
GET |
|
Get types (configuration filters) |
|
GET |
|
Get configurations |
|
GET |
|
Get all companies |
|
GET |
|
For contact creation |
|
GET |
|
For contact creation |
|
GET |
|
note types |
|
GET |
|
contact notes |
|
GET |
|
contact |
|
GET |
|
contacts count |
|
GET |
|
valiadate client portal credentials |
|
POST |
|
request reset password |
System
|
Type |
API (resource) |
Description |
|---|---|---|
|
GET |
|
Get resources |
|
GET |
|
Get API resources |
|
GET |
|
Get departments |
|
GET |
|
Get audit trial |
|
GET |
|
Get system callbacks |
Finance
|
Type |
API (resource) |
Description |
|---|---|---|
|
GET |
|
Get the list of invoices |
|
GET |
|
Get a specific invoice |
Service
|
Type |
API (resource) |
Description |
|---|---|---|
|
GET |
|
Ticket notes |
|
PATCH |
|
Update ticket note |
|
GET |
|
Ticket timeline |
|
GET |
|
Tickets |
|
GET |
|
Time entries |
|
GET |
|
Priorities |
|
GET |
|
tickets |
|
GET |
|
boards |
|
GET |
|
types |
|
GET |
|
subtypes |
|
GET |
|
items |
|
GET |
|
statuses |
|
GET |
|
impacts |
|
GET |
|
severities |
|
GET |
|
locations |
|
GET |
|
sources |
|
GET |
|
agreements |
Ticket Notes
|
Type |
API (resource) |
Description |
|---|---|---|
|
POST |
|
toggle note type |
Time Entries / Schedule entries
|
Type |
API (resource) |
Description |
|---|---|---|
|
GET |
|
time entries |
|
GET |
|
time entry |
|
GET |
|
work types |
|
GET |
|
work roles |
|
GET |
|
schedule entries |
|
GET |
|
schedule entry |
|
GET |
|
statuses |
The final step to take in setting up the MSP Process -> Halo PSA integration is to configure a Custom Tab within Halo PSA that'll contain the MSP Process pod.
The first step is to obtain the URL for your MSP Process pod; to do that, go to Integrations -> PSA Integrations -> Halo
Click on the Get Link to v2 Pod as shown below:
Login to Halo PSA and click on Settings -> Custom Objects:
Click on Custom Tabs:
Create a new custom tab, and specify the details as outlined below:
Once you've saved that Custom Tab, the final step is to associate it with the appropriate Ticket Types - Halo lets you choose which types of tickets have what Custom Tabs, so you can customize what your Technicians can do and see.
Navigate to Configuration -> Tickets -> Ticket Types, and edit the Ticket Type (for example, Incident). On the Allowed Values tab, there is a Custom Tabs section; add the MSP Process custom tab there, or enable the Allow all Custom Tabs option.
Once you've finished modifying the Ticket Type, save your changes. You're done! Now you'll see the MSP Process custom tab show up in your tickets:
Setup new ConnectWise Pod v2
If you are not utilizing our new version of the pod it is very simple to update to the new one. You can also run them concurrently until you are sure v2 is working properly for you.
Login to MSP Process and go to Integrations -> PSA Integrations -> ConnectWise.
Once you click ConnectWise you will see v2 link as shown below and you can click the copy button next to it.
Now login to Connectwise and go to System -> Setup Tables and Search for Manage Hosted API.
Once you select it you can update your existing POD or create a new one and utilize both side by side until you are sure v2 meets all of your needs. The naming of your pods may be slightly different than mine below but we recommend updating both Contact and Service Ticket pods.
Select one of the existing ones to update it:
Update the origin link to:
To note if you want to create a new pod then the pod should look like the one above. The only setting to consider is whether you want the pod to be 600 or 800 in size. We generally recommend 800 if you have larger screens. If on a laptop you may want 600.
Risks of not implementing End User Verification Client Facing Educational Documents
Disclaimer: This is not a substitute for Legal advice. Pleas consult with your attorney on local, state and federal guidelines before including this in any legal agreements. This document is intended for educational purposes.
Risks of Not Implementing End User Verification with Company Signature
Introduction
In the digital age, verifying the identity of end users has become a crucial aspect of managing security and maintaining trust in business operations. End User Verification (EUV) processes, particularly those that include a company signature (either digital or physical), play a critical role in ensuring that services and information are accessed only by authorized individuals. This document outlines the potential risks associated with the refusal or failure to implement an EUV system that includes a company signature, emphasizing the importance of such measures for safeguarding business integrity, customer trust, and legal compliance.
Risks Associated with Non-Implementation
- **Increased Vulnerability to Fraud and Identity Theft**
Without a robust EUV process, businesses are more susceptible to fraudulent activities. Fraudsters can easily impersonate users or create fake accounts, leading to identity theft and unauthorized access to sensitive information. This not only results in financial losses but can also damage the company's reputation.
- **Legal and Compliance Risks**
Many industries are governed by strict regulatory requirements that mandate the verification of customer identities (e.g., GDPR in Europe, KYC regulations in the banking sector). Failure to implement an EUV system with a company signature can result in non-compliance, leading to hefty fines, legal sanctions, and remediation costs.
- **Data Breaches and Security Incidents**
Lack of end user verification weakens the overall security posture of a company. It becomes easier for attackers to gain unauthorized access to the system, potentially leading to data breaches. Such incidents not only have financial repercussions but also erode customer trust and loyalty.
- **Loss of Customer Trust and Reputation Damage**
Customers expect businesses to protect their personal information and ensure secure transactions. A company's refusal to implement adequate EUV measures can lead to a perception of negligence, undermining customer trust. Rebuilding reputation after such damage is often costly and time-consuming.
- **Operational Disruptions and Financial Losses**
Fraudulent activities facilitated by inadequate EUV processes can disrupt operations, requiring significant resources to address security breaches, investigate fraud, and implement corrective measures. These disruptions often lead to direct financial losses and increased operational costs.
- **Decreased Market Competitiveness**
In a market where competitors are enhancing their security measures and trustworthiness through robust EUV processes, companies that fail to do so may find themselves at a competitive disadvantage. Customers and partners are more likely to engage with businesses that demonstrate a commitment to security and privacy.
- **Increased Risk of Insider Threats**
Without effective EUV, it's challenging to track and monitor user activities accurately. This increases the risk of insider threats, as malicious or negligent actions by employees, contractors, or partners can go undetected. Insider threats are particularly dangerous because they can cause extensive damage due to their access to sensitive information.
Conclusion
Implementing End User Verification with a company signature is not just about adhering to regulatory requirements; it's a fundamental component of a comprehensive security strategy that protects against a wide range of risks. The refusal to implement such measures can expose businesses to significant vulnerabilities, including financial losses, legal penalties, operational disruptions, and reputational damage. To safeguard their interests, assets, and stakeholders, companies should prioritize the implementation of robust EUV processes that include company signatures as a standard practice for verifying and authenticating user identities.
Recommendations
- Assess Current Security Posture: Conduct a comprehensive security assessment to understand the existing vulnerabilities and identify the need for enhanced EUV processes.
- Implement Robust EUV Solutions: Invest in and implement advanced EUV technologies that include company signatures, leveraging biometrics, digital signatures, and other authentication methods.
- Regular Training and Awareness: Educate employees, partners, and customers about the importance of security and the role of EUV in protecting their information.
- Continuous Monitoring and Improvement: Regularly review and update the EUV processes to adapt to emerging threats and changing regulatory requirements.
- Legal and Compliance Consultation: Work with legal and compliance experts to ensure that the EUV processes meet all relevant regulatory requirements and industry standards.
Waiver of Liability for Non-acceptance of Zero Trust Policy Client Facing Educational Documents
Waiver of Liability for Non-Acceptance of Zero Trust Policy
I, [Your Name], hereby acknowledge that I have been informed of the zero trust policy implemented by [Organization/Company Name], herein referred to as "the Company." I understand that the zero trust policy is designed to enhance security measures within the Company's network and systems.
I further acknowledge that despite being informed of the zero trust policy, I have chosen not to accept or adhere to its principles and guidelines.
By not accepting the zero trust policy, I acknowledge and agree to the following:
-
Assumption of Risk: I understand that by not adhering to the zero trust policy, I may be exposing myself and the Company to increased cybersecurity risks, including but not limited to unauthorized access, data breaches, and other security incidents.
-
Release of Liability: I hereby release, waive, discharge, and covenant not to sue the Company, its officers, directors, employees, agents, and affiliates from any and all liabilities, claims, demands, actions, or damages of any kind arising out of or related to my decision not to accept the zero trust policy.
-
Indemnification: I agree to indemnify and hold harmless the Company, its officers, directors, employees, agents, and affiliates from any and all liabilities, damages, losses, costs, or expenses (including reasonable attorneys' fees) arising out of or related to any security incidents or breaches resulting from my non-acceptance of the zero trust policy.
-
Acknowledgment of Consequences: I acknowledge that the Company has provided me with ample opportunity to review and understand the implications of not accepting the zero trust policy. I understand that my decision may impact my access to certain resources, systems, and privileges within the Company.
-
Voluntary Agreement: I certify that my decision not to accept the zero trust policy is voluntary and made of my own free will, without coercion or undue influence from any party.
I have read this waiver of liability and fully understand its terms and implications. I acknowledge that I am voluntarily waiving certain rights by not accepting the zero trust policy.
Signed this [Date] day of [Month, Year].
[Your Signature]
[Your Printed Name]
Please note that this waiver is a template and may need to be reviewed and adjusted by legal professionals to ensure compliance with relevant laws and regulations in your jurisdiction and to tailor it to the specific circumstances of your organization.
End User Verification using Secure Data Link End User Verification
End-user verification with a secure, single-click link can be achieved with either an email or SMS to transmit the secure data link to the client. The follow step is for the secure like via email:
Make sure that the client is expecting to see an email from noreply@mspprocess.com and that they click the secure link within the configured time the link is valid (by default, it is set for 5 minutes). The logo, text, signature, and footer are all configurable.
This is what the client will see when they click on the secure link in the previous email. The colors, color gradient and logo are configurable. Once they click on "Validate" the end-user verification process will be complete.
This is what the result will look like from the technician's perspective. Note that the duration that the shields will stay green after successful verification is configurable.
The following is the secure link via SMS:
If you click on the Verification History down arrow, you will see the history of verifications for this contact. The number of history entries is configurable:
To close the Verification history, click on the "up" arrow.
How To Verify a Technician's Identity Over SMS Client Facing Educational Documents
Adhering to our Zero-Trust Policy, your staff should treat every incoming call from us with skepticism and initiate the Technician Verification process without hesitation. With a clearly defined and easily accessible procedure, you attain peace of mind in mere moments.
{yourMSP} has a dedicated verification number to which you can direct all Technician Verification requests to. It is {VerificationNumber}.
For all purported requests from {yourMSP}'s service desk, please send a #verify message to {VerificationNumber}:
In a few seconds, you will be provided with a code, as above and in this case 870421, that should also be the code that your service desk technician should be provide to you. If it matches what you have been provided, you can be assured that the current call is from a legitimate technician from the {yourMSP} service desk.
With your satisfaction that the code matches, please respond with a #confirm to the same phone number and SMS conversation. This will close the Tech Verification process and will log this interaction with our service desk software and tied to the service ticket that your technician is calling about:
E-mail Template: What is End-User and Tech Verification? Client Facing Educational Documents
What is End-User and Tech Verification?
End-User and Tech Verification are identity verification techniques that confirm the identity of the respective person. Identity verification, in the context of cybersecurity and access control, refers to the process of confirming and validating the identity of individuals who are trying to access a system, application, or network. The goal is to ensure that only authorized users gain access to specific resources, while unauthorized or malicious actors are prevented from doing so.
Why does an {MSP} make use of Identity Verification?
{put MSP Name here} has adopted a Zero Trust Policy (ZTP). A ZTP is an approach to cybersecurity that assumes no entity, whether inside or outside the organization, can be trusted by default. This security model requires strict verification of anyone trying to access resources in the network, regardless of their location or the device they are using. There are several reasons why we have adopted a zero-trust policy:
- Changing Perimeter: Traditional security models rely on a secure perimeter, assuming that once someone is inside the network, they can be trusted. However, with the rise of remote work, cloud computing, and mobile devices, the concept of a secure perimeter has become less relevant. Zero trust acknowledges that threats can come from both inside and outside the network.
- Advanced Threats: Traditional security measures are not always effective against advanced persistent threats and sophisticated cyber-attacks such as AI-induced Voice Phishing Attacks. A ZTP approach helps to mitigate the risk of these threats by continuously verifying and authenticating users.
- Data Security: As organizations increasingly store sensitive data in the cloud and allow remote access to their networks, protecting data becomes paramount. ZTP ensures that only authorized users have access to specific data and resources, reducing the risk of data breaches.
- Mobile Workforce: With more employees working remotely or using mobile devices to access corporate resources, the traditional model of trusting devices based on their location becomes impractical. Zero trust considers every access attempt as potentially untrusted, regardless of the user's location.
- Privileged Access: Zero trust is particularly important for managing privileged access. Even employees with higher levels of access must continuously authenticate and prove their identity, reducing the risk of misuse of privileged credentials.
- Insider Threats: While the majority of employees are trustworthy, insider threats can still pose a significant risk. Zero trust helps organizations minimize the potential damage from insider threats by enforcing the principle of least privilege and continuous monitoring.
- Compliance Requirements: In many industries, there are regulatory requirements that mandate a high level of security and data protection. Adopting a ZTP can help organizations meet these compliance standards and demonstrate a commitment to securing sensitive information.
By adopting a ZTP, {MSP} aims to enhance our client’s overall security posture, adapt to the evolving threat landscape, and protect critical assets from both internal and external threats.
What are typical ways to Authenticate an Identity?
The goal of identity verification is to ensure that the person claiming a particular identity is, indeed, who they say they are. Verification, to be effective, relies on Multi-Factor Authentication (MFA). He is a list of factors that we rely on:
- Something You Know: This involves knowledge-based factors such as passwords, PINs, or security questions. Often these are not available at the time of authentication because of forgotten information. They can often be compromised because they are often shared or based upon easily generated information (birth dates, addresses or less.)
- Something You Have: This includes possession-based factors such as security tokens, smart cards, or mobile devices. In the case of a mobile device, this usually means the phone number and possession of the device as forms of authentication because you can reference them via a phone call, SMS or an application notification push.
- Something You Are: This involves biometric factors like fingerprints, facial recognition, or retina scans. With access to your mobile devices your biometric information authenticated and stored on the device is proof of something that is unique to the end user.
So how does End-User Verification make use of the Authentication Factors listed above?
End-User Verification is a 30-second process and because of our ZTP, it is required on every service desk call from our clients.
SMS send – EUV pushes a 6-digit code or a single-click link to a mobile device (Something you Have). Since the end-user has supplied the phone number (Something you Know) of the mobile device that relies on a PIN, Password (Something you know) or a biometric (Something you Are) to access the device, you have three levels of authentication in place.
Email send – as above, EUV pushes the 6-digit code or single-click link to a known email address. The email box would be authenticated by the physical access to the mobile or desktop device AND to the email client.
Client Portal or Client App – in the event that you don’t have access SMS or email or it is more convenient to do so, the user can access either the Client Portal with a password (Something You Know) or the Client App with a biometric login (Something you Are). Once the End-User has accessed the Portal or App, the technician can push a code or a confirmation request for the End-User to complete the Verification.
What is the purpose of Tech Verification?
Often threat actors will pose as a technician from a service desk in an attempt to gain access to your network, servers, or other network applications. They often sound credible because they may have obtained some pertinent or meaningful information that can be used to fool you into believing that you are speaking with a technician from the {MSP} service desk.
With ZTP, all End-Users should verify any solicited or unsolicited call purporting to be from {MSP} or our service desk.
Tech Verification is a simple, 30 second process. The End-User sends #verify using SMS on their mobile (Something you have) number to our published Verification phone number (Something you know). In response to this, you will be provided with aa unique 6-digit code that only you and a valid service technician from our service desk will know. When the technician provides this code to you, and you are satisfied that it is correct, you send #confirm on SMS back to the Verification phone number.
Here are some tips to help you prevent phishing attacks:
Don’t trust caller ID: Caller ID can be easily spoofed, so just because a call appears to be from your {MSP} or other Service Provider doesn’t mean it’s legitimate. Always be suspicious of unsolicited calls asking for personal, network, applications or computer information.
Verify the caller: If someone calls claiming to be from your {MSP} provider or another organization, initiate the Tech Verification procedure or hang up and call them back using a phone number you know to be genuine. Don’t use the number they give you, as it may be fake.
Don’t give out personal information: Never give out personal or corporate information, such as passwords, PINs, or credit card numbers, to someone who calls you, until you have confirmed that they belong to a trusted organization.
Modes of Operation for Zero-Trust Policy on Voice Calls Client Facing Educational Documents
Introduction
Enterprises or individuals (collectively referred to as End-Users or “EU)” recently have been burned by Threat Actors (“TA”) who pose as authority representatives from a government, bank, telecom provider, IT service provider, or any other service provider (collectively referred to as Service Providers or “SP”). They try, through what is colloquially called voice phishing, to pry information from the EU which might enable them to compromise the EU’s enterprise systems, data, bank accounts, etc. In an attempt to thwart the threat attempts, we have developed a Verification System (“VS”) which allows the EU to verify that any voice call requests can be verified as legitimate or a threat.
How is it achieved?
This is accomplished by training the EU to have no trust for any incoming phone call from any SP seeking proprietary information. They are instructed to initiate a verification sequence to validate that the request is from a legitimate entity at the SP.
This provides confidence because it is achieved through multi-factors, all of which are only known by the two participating and valid entities – the SP and the EU.
There is always an a priori information known only by each entity. In the case of the SP, they would know the EU’s phone number, email address or that the EU is a valid registered user of the Customer Portal (“CP”). The EU would know of the SP-provided phone number, email address, or CP. The CP is protected by a UserID/Password sequence.
No matter what medium is used for verification – SMS, email, CPl – the process for the verification follows a very similar procedure. There is always something that is known between the two parties that is not generally published for public consumption such as an SP-provided SMS phone number (“SPN”), Private email address (“PEA”), or a customer portal (“CP”) with a UserID/Password (“UIP”) login sequence.
The sequence would be as follows:
- The SP has reason to contact the EU, and this is done through a voice call to the EU. The SP may be a IT SP responding to a service request ticket, or a bank looking for confirmation on a potentially fraudulent transaction.
- The agreed upon policy between the SP and the EU is that the verification procedure will be initiated for any voice call initiated by the SP to the EU
- The EU, using the agreed upon medium (SMS on a mobile device, an email on mobile, laptop or other computing device, or a web-based customer portal accessed by any of the above devices, the EU starts the verification request (“VR”) by sending a Verify Code (“VC”), #verify for example, to a pre-agreed but private SPN, or a pre-agreed PEA. In these cases, the VC must be initiated from an EU email address or phone number known by the SP. In the case of the CP, the EU logs into the CP with their specific UIP, and clicks on a Verify button within the CP.
- Any of the above Verify commands initiate a sequence of events within our VS that will be completed when the EU has been satisfied that the SP been verified or can reject the verification. In the event that the VR comes from an unknown phone number or email address, the VR process will not be started. However, all VR will be logged for compliance and historical recall.
- The VS will generate a random number (usually 6 digits, but could be any number) that will be:
-
-
- Sent back to the EU through the medium (SMS, email, or CP) from where the VR originated and to the respective phone number (SMS) or email address (email) that originated the VR. In the case of CP-originated VR, the code will be pushed to a banner on the CP. In all cases the code will be sent with an appropriate message indicating its use. The message will read something thing like “The verification code ‘012345’ should be provided BY your service provider. If the code matches the one previously provided to you, you may initiate the confirmation response”.
-
-
-
- Provided to the SP in a SP console with a message that will read something like “ Please provide code ‘012345’ to the EU.
-
-
- The SP will provide the code to the EU via the phone call.
-
- If the EU is satisfied that the SP has provided the corresponding matching code:
-
-
- the EU may give a verbal confirmation to the SP that they are satisfied with the legitimacy of the SP and continue the phone call in which case the SP must manually log this response,
-
-
-
- the EU may send a Confirmation Code (“CC”), #confirm for example, to the SPN or the PEA. In the case of the CP, the EU would click on the “Confirm” button within the CP.
-
-
- If the EU is not satisfied that the SP has provided the matching code the EU may:
-
-
- Hang-up the phone
-
-
-
- Re-initiate the VR
-
5. There are some ancillary functions of the VR that can be considered in specific applications. In the event that the SP has a service or help desk platform, the entire sequence of events ( VR, and corresponding response) can be logged within a service ticket for posterity when the Verification Sequence has been completed. This could be automatic or at the approval of the SP personnel.
E-mail Templates: Short Introductions to Zero Trust Policies Client Facing Educational Documents
Subject: End-User Verification: Ensuring Mutual Security with {Your MSP Name}!
Body:
In today's digital landscape, cyber security threats loom large, fueled by the rapid advancements in Artificial Intelligence. At {Your MSP Name}, we're dedicated to staying ahead of these threats and fortifying our service desk against potential breaches.
Think about the routine verification processes you encounter when contacting your bank, government agency, or mobile phone provider. Shouldn't the same level of scrutiny be applied when safeguarding your business?
That's why {Your MSP Name} is implementing a Zero-Trust Policy for End-User Verification. Every interaction with our service desk involves a simple identity verification process, ensuring that only authorized personnel access your sensitive information or provide support instructions.
While we understand that this additional step may seem like a minor inconvenience, it's a critical measure to uphold the security of your business. Our End-User verification process is designed to be seamless, non-intrusive, and efficient, eliminating the need for memorization of information or PINs and typically completed in seconds.
With {Your MSP Name}, rest assured that your security is our priority. Together, let's reinforce our defenses and create a safer digital environment for your business.
Subject: Technician Verification: Elevating Your Security with {Your MSP Name}!
Body:
At {Your MSP Name}, our team is highly trained to detect security threats. However, as the landscape of voice-phishing attempts evolves with increasing sophistication, we've bolstered our Zero-Trust security policy by introducing End-User Verification. Through our proactive security measures, we enhance your overall security.
Yet, many businesses lack the necessary tools to combat similar attacks within their own environments. That's why {Your MSP Name} offers a swift Technician Verification process, enabling you to promptly and accurately confirm the identity of any caller claiming to be from our team. Adhering to our Zero-Trust Policy, your staff should treat every incoming call from us with skepticism and initiate the Technician Verification process without hesitation. With a clearly defined and easily accessible procedure, you attain peace of mind in mere moments.
Seeking evidence of our commitment to the Zero-Trust Policy? Rest assured, all verification interactions between {Your MSP Name} and your organization are meticulously logged for compliance and historical reference.
Together, we're dedicated to ensuring robust security measures.
Instructing your Customer About the End-User Verification Workflow Client Facing Educational Documents
End-User Verification
{yourMSP} takes security seriously. As part of that, we will be verifying your identity on each call to our Service Desk.
The End-User Verification will take one of 7 forms depending on what information we have available and the available configurations (Duo, Client Portal) :
1) If we have a valid email in our system verification can take one of two forms:
-
- email one-click Secure Link. Note that his email will come from noreply@mspprocess.com. Please click on the link as indicated below within the specified period of time:
The final step is to click on the "Validate":
If the Validate completed successfully, you will see the following:
2) If Duo has been configured, please go to your Duo Mobile app on your mobile phone and "Approve" the verification push:
3) If we have a valid mobile phone number on file we can do the End-User Verification via SMS. The published phone number for all Verification requests for {yourMSp} will come from {YourVerificationNumber}:
- Six-Digit Code - Please repeat the six-digit code back to your service desk technician within the specified period of time:
4) Single-Click Secure Link - when you receive the text via SMS, please click on the validation link as specified below:
Click on "Validate" to complete the verification process:
If verification is successful, you will get the following screen. The verification is now complete:
5) If a client portal has been configured, verification can proceed via the client portal. Please go to http://{your Msp}.mspprocess.net and log in to the portal with your credential information.
When you are logged in and ready, your service technician will verify you in one of two ways:
-
- Confirmation from the Client Portal. Click on the "CONFIRM" button before expiration:
6) Confirmation from the Client Portal with a six-digit code sent via SMS to your mobile phone:
Take the six-digit code that you receive from your mobile phone via SMS to put in the client portal dialog box and click "CONFIRM":
7) If no email or mobile phone is available, you can be verified with a voice phone call to the specified landline phone that we may have on file. The automated system will read you a six-digit phone number so be prepared to write this single-use number down. The six-digit will be repeated a second time if you happen to miss the first time. Provide this six-digit code to your service technician. Your technician will confirm the sucessful completion of the verification.
End-User Verification using SMS End User Verification
This is using Connectwise Manage Pod integration for Illustrative Purposes but can be done from any PSA using the integrated POD or through the MSP Process Admin portal.
On the Pod, make sure the appropriate phone number is selected for the chosen contact. If you choose a PSA Contact other than the default one, you will be required to provide a note, eg Manager Approval. That note is can be enforced through configuration. One the "Send Code" has been clicked, the six-digit code will be sent via SMS to client and the technician must receive, verbally, the code sent to them.
Once the code is received verbally from the client, it must be placed in the "Enter Code Here" box, as below.
Now the shield for the phone number verified should turn green for the configured amount of time.
Introduction
Duo (https://duo.com) is a popular identity verification platform. You can use it in MSP Process to acheive two goals:
- To secure the login process of anyone looking to access your MSP Process account at https://app.mspprocess.com. This capability requires the Duo Web SDK to be configured. Click here for the KB article that outlines how to set this up.
- During the end-user verification process; Duo can be used instead of sending the user a verification code via e-mail or SMS. This capability requires the Duo Accounts API and Admin API to be configured.
This KB article will take you through all of the steps required to do the second scenario - to use Duo to verify your end-users, including setting up 2 entities in Duo (their Accounts API and Admin API entities) and configuring the appropriate settings within MSP Process.
Step 1: Protecting the 'Accounts API' Application in Duo
What is the Accounts API? The Accounts API allows Duo MSP partners to create, update, and delete managed Duo Security customer accounts.
NOTE: You'll only need to do this part once, at the 'parent' account level in Duo.
Steps to Take in the Duo Admin Portal:
- Login to the Duo Admin portal (https://admin.duosecurity.com/) - you must be an Owner-level user in Duo
- From the left-hand menu, navigate to Application -> Applications
- Click the Add Application button
- Search for "Accounts API" in the Search field
- Click on the Protect button beside Accounts API
- In the Basic Configuration section, change Name field to say "Accounts API for MSP Process"
- In the Details section, copy the Integration Key, Secret Key and API Hostname; you'll need them later
- Click Save
Steps to Take in MSP Process:
- Login to the MSP Process portal (https://app.mspprocess.com)
- Navigate to Integrations -> Security Integrations
- Click the Duo Accounts API button
- Specify a name for the integration, and then enter the Integration Key, Secret Key and API Hostname from what you setup earlier in the Duo Admin Portal.
- Click Submit when you're done.
Step 2: Protecting the 'Auth API' Application in Duo
What is the DUO Auth API? Duo Auth API is a low-level, RESTful API for adding strong two-factor authentication to your website or application.
NOTE: You'll need to repeat the steps in this section for each sub-account that you want MSP Process to be able to access.
Steps to Take in the Duo Admin Portal:
- Login to the DUO Admin portal (https://admin.duosecurity.com/)
- From the left-hand menu, navigate to Application -> Applications
- Click the Add Application button
- Search for "Auth API" in the Search field
- Click on the Protect button beside DUO Auth API
- In the Basic Configuration section, change Application Name field to say "Auth API for MSP Process"
- Also in the Basic Configuration section, choose the Enable for all users option for User access:
- In the Details section, copy the Integration Key, Secret Key and API Hostname; you'll need them later
- In the Settings section, enable "Simple" username normalization:
- Click Save
Steps to Take in MSP Process:
- In MSP Process, navigate to Integrations -> Security Integrations
- Click the Add new integration button
- Click the Duo Auth API button
- Specify a name for the integration, and then enter the Integration Key, Secret Key and API Hostname from what you setup earlier in the Duo Admin Portal.
- Click Submit when you're done.
Congratulations! You've Done It!
You've now setup the required entities in Duo, and configured MSP Process with the information it needs to start using Duo to verify the identity of your end-users.
Notification Groups and Scheduling Setup Scheduling / On Call
Definition of Terms:
Notification Group - is the entity which contains your on-call team members. You can configure Notification Groups from the Monitor & Notify -> Notification Groups menu.
Notification user - A user that can be manually added, imported from your PSA or from MSP Process users. If a schedule is assigned to the user, it will only send notifications to that user during the schedule assigned.
Scheduler - mathematic formula, which has start and end period (not more than one year length) and describes time and date of availability.
Creating a Notification Group
Name your new group and press “Confirm” button. You could select MS Teams connection if needed. MS Teams notifications will be delivered independent on users’s schedulers rules. You can create a Teams connection by following the steps outlined in this article.
Creating a Notification User
After pressing “Edit” on the notification groups list, you will be available to edit group name, adjust the MS Teams connection and configure notification users.
-
New group - Add new user
-
From PSA user - clone user information from PSA (integration connection required)
-
From MSP Process - clone user information from your tenant user
A Notification User is an independent entity. In case you clone from PSA or MSP Process user, after changing phone, email or name on PSA (ticketing system) side, notification user details will remain stable.
After creating a Notification User the Admin has to setup a Schedule for the Notification User. There could be several rules for a single Notification User in order to account in day to day differences that may factor into creating a rotation.
Creating On-Call Schedules for A Notification User
To describe the schedule rule formula, the admin should set name, color, rule range (start and end, being no greater than 1 year), with the rest of configurations being optional. You may use the “Test” button to see the output of the configuration prior to creation.
Below is an example of an on-call schedule rule with notes describing each section:
More Reference Examples:
-
User is on call every working day from 9:00AM until 12:00AM
-
set the dates that the rule will apply to, and the length of the rule
-
set working hours
-
unselect any applicable days
-
User is on-call following a rotation of 1 day on followed by 2 days off from 12:00PM until 12:00AM.
-
set the dates that the rule will apply to, and the length of the rule
-
set working hours
-
set repeat period with start (starting today, repeating every 3 days - 1 working day with 2 days off, period length is 1 working day)
if Repear Every field is equal to 1 - no periods calculated and rule applies for each day
-
User is on call every second week from Monday till Friday from 9:00AM to 4:00PM
-
set the dates that the rule will apply to, and the length of the rule
-
set working hours
-
set repeat period (weeks) with start (Monday of todays week, repeat every 2 weeks - 1 working and 1 off, period length of 1 week)
-
disable Sun and Sat
-
User works every working day from 9:00AM until 6:00PM with a lunch from 12:00PM till 1:00PM
-
create two different rules - one to account for 9am until noon, and one from 1pm until 6pm.
-
User works every third night from 9:00PM until 9:00AM and then has 2 days off
- In this case we create two rules (one before midnight and one after) repeating every 4 days and period of 1 day
- The user has 3 days between periods, working hours will be 1 night at work - 2 at home with this rule configuration.
In short, dependent on the unique schedule we are applying, there may require multiple rules to account for all of the working hours we wish to have covered. Once a single rule set is generated to account for one notification user's rotation, you may duplicate this for the remaining user's in the rotation.
Ensure to make use of the weekly or daily filters within the scheduling viewer to finalize this setup and ensure there are no gaps where we would wish for a user to be notified.
To initiate an SMS Conversation from within MSP Process portal following the instructions below:
Go to Ticketing -> PSA Ticketing as shown below and click the three dots next to any open ticket at the far right and choose Add SMS Channel.
SuperOps AI Integration SuperOps.ai
Introduction:
Configuring the integration between MSP Process and SuperOps is quick and easy, and consists of just a few steps:
- Creating a custom field in SuperOps to store your client's mobile/cell numbers
- Creating an API token in SuperOps
- Configuring the SuperOps integration module in MSP Process
- Configuring Ticket Defaults in MSP Process
Step 1: Creating a custom field in SuperOps to store your client's mobile/cell numbers
First lets configure a custom field in SuperOps that will store your customer's mobile/cell number. MSP Process will use that field when you verify your users via SMS.
- Login to SuperOps
- Navigate to Settings -> Advanced Configuration -> Manage Fields
- Click on the Requesters tab
- Click the Create button, and choose the Short Text data type
- Enter a name for the field; MSP Process will recognize any of the following names (case insensitive):
- mobile phone
- mobile number
- cell phone
- cell number
- cell
- mobile
- Now that you've created the custom field, you'll need to populate it for each of the Requester users that you have in SuperOps. To do this, navigate to Client Management -> Clients, and click on Clients -> Requesters from the left-hand nav bar. From this screen you'll be able to edit each Requester and populate the custom field accordingly.
Step 2: Creating an API token in SuperOps
Now lets generate an API token from SuperOps. In addition to the API token you will need the web address of your SuperOps site.
Generate the token and click the copy button next to the token.
Step 3: Configuring the SuperOps integration module in MSP Process
To setup SuperOps AI Integration in MSP Process go to Integrations -> PSA Integrations and click on Add PSA.
Select SuperOps from the list of Integrations:
Input your web address you gathered from SuperOps URL and your API key as shown below:
Step 4: Configuring Ticket Defaults in MSP Process
The last step is to configure your ticket defaults based on your SuperOps settings:
Once you have setup your PSA and ticketing defaults you can now use End User Verification and other components of the integration. For end user verification follow the instructions below:
Verifying End Users within MSP Process Portal
Client Portal Chat Notifications Client Portal
To Enable Notifications for Client Portal chat there are two components to it. The first is to enable notifications on your MSP Process account. You can do this by going to the profile icon in the top right next to your name as shown below:
Turn on and set your email or SMS notification preferences:
Then go to Client Portal -> Configurations and edit your configuration as shown below:
Enable Notifications and set it to 1 min for the fastest notification. Then click one or more users who will get notified on inbound client portal chat requests.
Click Submit. If you select more than 1 user the system will round robin notifications.
Secure Data Send Settings How to Articles
To configure the default settings for the Secure Data Send feature, login to the main MSP Process UI (https://app.mspprocess.com), and navigate to the Secure Data Sharing -> Secure Data Settings page.
The Secure Data Settings page allows you to configure how sending both text and files will behave. You can also choose to lock down these settings, so they can't be modified by your Technicians.
Disable technician ability to change link, logs and file settings on secure data page - This locks the settings that a technician sees when sending a customer data or text.
Enable File Sending - This enables the ability to securely send files to your customers. By default, it's enabled.
Single Use Link - This makes it so that the end-user can only access the text/data once.
Time to live for secure text send links - When sending text, this controls how long the link will be active.
Save Logs to Ticket/Contact - This will save the actions of the tech and the user regarding the link. This includes when the tech sent it, and when the user opened it.
Save logs to internal note - This will save logs of all actions to the internal note on your PSA instead of public discussion note section.
Save data to internal note - Whatever password or text is sent to the user would be logged as an internal note. By default this option is disabled.
File save expiration period - Controls how long a file will be available. Default is 1 day.
File save location - Controls which region the file will be stored. By default this will be in the same country that was specified for your tenant with MSP Process. There is storage available in the following regions:
- One in Canada Central (located in Toronto)
- Another in Central US (located in Iowa)
- Another in Europe (located in Frankfurt, Germany)
- Another in Australia East (based in Sydney)
- And one in UK South (based in London)
Page Header Text - This is the header displayed to the user above the link when they receive the message and click the link.
Message on Reveal Secure Data - This is a message is revealed once the user shows the data from the link.
SMS Template - Messaging that is sent with the SMS link to the user. You can put text before and/or after the link. Do note remove the ${link} as this will break the functionality.
Email Template - Same as above, you can add text before and/or after the link.
Data Storage and Deletion
When your send Text to your end-user, we do not store that data in our system. All that is stored in MSP Process is the decryption key for the data. When your end-user access the data, we immediately delete the decryption key.
When you send a File to your end-user, we store the file, in encrypted form, in our system. Once your end-user has downloaded the File, we delete that File within two hours.
How to Invite Clients to your Client Portal Client Portal
Now that you have created a Client Portal using the "Client Portal Creation" KB article, it is time to invite your clients to use the CIient Portal. This can be done singularly or in bulk. Both will be described in this article.
To access the list of your clients who may be invited to the Client Portal: choose Ticketing -> PSA Contacts.
Singular Client Invite
First, find the user that you would like to invite. You can narrow down the options by putting search terms in the appropriate search box of the appropriate column. Next, click on the "monitor" icon on the appropriate user that you wish to send an invitation to.
Finally, when the dialog box appears, choose the appropriate Client Portal. If you set a password, this will be the password that the user uses in combination with their email address. If you leave the Password box blank, the user will be requested to update/create their password on the first login.
The email will be sent out using the default Client Portal Invite template. If you wish to change this template, please review KB article "Customize Client Portal Invite Email".
Bulk Client Invite
First, choose the clients that you would like to invite to the Client Portal. They can be filtered by Company or any of the other searchable criteria. Once they invitees have been selected, click on "Send Invites" on the far, top, right side.
Finally, choose the appropriate Client Portal and then "Submit"
The email will be sent out using the default Client Portal Invite template. If you wish to change this template, please review KB article "Customize Client Portal Invite Email".
Creating a Client Portal Client Portal
Click on AI Service Desk > Ticketing > Ticket Properties. This will let you specify the properties of the tickets that will be created - for example, the Board or Queue of the ticket, it's Priority, Source and more.
Some of the choices for some of the items may not appear as shown as they are configurable items in your PSA.
AI Service Desk > Client Portal > Ticket Templates. Once the Ticket Property is created, the next step is to create Ticket Templates to gather the relevant details from users submitting tickets. Ensure that there is a relevant ticket property for each ticket template that you wish to differentiate between.
AI Service Desk > Client Portal > Configurations. This will allow you to create as many Client Portals as you would with unique companies and users.
This configuration page allows the creation and customization of a client portal. Hit Submit when complete. You may edit the resulting configuration to make changes.
Customize Client Portal Invite Email Client Portal
Click on Client -> Invite Email Template
Then click the checkbox as shown below to customize the default email template. Be careful not to remove links that are in use. You can also use the + to the left of the email body to add in any links needed.
Scheduled Entry/Service Call Notification Setup Data Ingestion & Notifications
This support article will help you setup Scheduled Entry (for ConnectWise Manage) or Service Call (Autotask) Notifications using our Monitor and Notify feature set.
Creating the App Bot:
Go to Monitor and Notify > App Bots
Click on Add New in the top right corner.
Ensure Status is set to Enabled and Data Processing is set to Identity and Non-Identity Fields.
Give it a name and select either ConnectWise Scheduled Entry Observer or Autotask Service Calls.
Click Integration and select ConnectWise and it will fill in all the integration fields.
Then choose Start from X days before now field and set it to a minimum of 3 days (we typically recommend 7 days as a solid benchmark). This will sync up scheduled data from the last 7 days so the system has a baseline for existing scheduled entries.
Finally, select the relevant Scheduling types for this App Bot and click submit!
In the Data View Creation pop-up that appears, check the link to app bot option, and then click the Create button.
Setting up the Notification Criteria:
You can then setup notification rules to target this data from Monitor and Notify > Notifications
Some common examples given the app bot we created may be:
- When you want to send out a notification on a new scheduled entry for a technician, when an appointment is coming up or past due.
- Notify clients based on technician being scheduled on their ticket.
Below is a sample notification where we are sending the technician a reminder notification 45 minutes before the call is due. Notice the last option should be turned on to skip the initial notification (ie when the resource was first scheduled). This prevents duplicate notiifcations.
If we did not use the repeat notification, then the system would just send notifications when resources are scheduled on a ticket.
Update Purchase Orders to ConnectWise Data Ingestion & Notifications
To post updates from an email that was parsed to a ConnectWise PO you can enable this on the Notification level as shown below:
Click Integration and select your integration PSA name and it will autopopulate the fields as shown below.
The next screen you can right click in each of the fields and add the variables to it.
Customize Contact Update Emails and Text Templates Contact Update Forms
Customizing Contact Update Form Emails/SMS Messages
You can customize the Contact Update emails/text messages that are sent to your end-users. Simply navigate to the Messaging > Contact Update Settings menu, and then open up the Email/SMS Templates section:
Do NOT remove the $url variable or any formatting as it pertains to the URL. Please only change the wording as removing the URL will remove the link the user will receive.
SMS Template: is the Opt-in Template language that is sent to the user as a text message, if you choose to send an Opt-In form to a mobile/cell number.
PSA Ticket Note Template: This is the note logged to your PSA when an Opt-in form is sent to the user.
Email Subject Template: This is the subject of the Opt-in Email.
Email Header Template: This a header template if you would like to use a header at the top of the Email.
Email Body Template: This is the body of the email and you can use HTML as well to design it.
Further Customization #1: Customizing the Logo that is in the Body of the E-mail
Be sure to add your logo to your tenant and turn it on for Email as shown below:
Go to Settings > Account Settings > Settings to verify it is setup properly.
Further Customization #2: Changing the Sender Address of the E-mail
By default, all e-mails that the MSP Process platform sends out come from noreply@mspprocess.com. You can have Opt-in form e-mails get sent through an M365 mailbox - we strongly recommend that you do so, so that your customers trust the e-mails you send them.
Instructions on how to set this up are ready and waiting for you in the following KB article:
Sending E-mails through an M365 Shared Mailbox (mspprocess.com)
Technician Verification - Using SMS Technician Verification
Technician Verification via SMS
Social engineering attacks by bad actors at an MSPs clients are increasing. Bad actors are imitating the MSP / IT Service Provider attempting to gain access to a computer, server or network. CDK Networks was breached recently and they leveraged that breach to immitate the MSPs/Service Providers by calling on the dealerships in attempts to gain access to client computers and networks.
The purpose for Technician verification is for the client of the IT company or service provider to verify the support company is legitimate before allowing access to their computer systems or providing sensitive information without verifying the caller. Typically, the systems available today provide a mechanism for the IT company verifying the end user calling in for IT support. This would be providing that same capability but in reverse.
The process could not be more simple. When you signup you receive a Verification Phone number. You simply provide this to all of your existing clients and let them know they can request a verification via SMS to it.
-
The user sends a #verify message to the number you have provided to them.
-
Each party is sent a randomly generated 6-digit code.
-
The Technician provides the code to the end user and assigns the verification to the ticket in progress for tracking.
-
The end user types #confirm to the same number to confirm the verification was successful.
- The user receives back an automated message showing the verification was completed successfully.
To test it out send #verify to the phone number you selected above in the first step from your mobile phone. You will receive back a code automatically.
The technician will also get a copy of this code in his PSA portal or inside our MSP Process webapp. ConnectWise is shown below for reference.
Once the technician reads the code back to the user, the user can type in #confirm and send to complete the confirmation process.
To setup Technician Verification:
First go to Identity Verification > Verification > Verification Settings > Select Verification Phone Number. If one is not already selected, please select one to use. This number will be used for both End User Verification and Technician Verification purposes. So your users will only need to use the one number and they will receive codes for end user verification over the same phone number.
If you require additional messaging numbers, to account for clients outside of your area/country code - simply reach out to our team, and we can get you set up with the required numbers!
Company Policies How to Articles
Company Policies
The Company Policies feature allows you to create a pop-up message, in our Autotask Insight/ConnectWise Pod/HaloPSA custom tab that can be customized per-Company. Company Policies are configured from the Identity Management -> Verification -> Policies page.
The Show Verification Banner on Load option means it will display the pop-up message you specify whenever your technicians open a ticket for the specified Company:
IP Address info for MSP Process Account Management and Security
FQDNs:
If you need to whitelist our IP or domains they are shown below:
IP address for https://app.mspprocess.com and https://pod.mspprocess.com:
20.118.48.12
API / App Bots / Live Chat/ Client Portal Outbound IP Address:
64.236.54.139
Uptime Monitor IP Addresses:
- Central US: 20.98.161.12
- West Europe: 20.56.100.179
MSP Process Engineering / Tech Support IP Address:
Deploying the MSP Process Pod in ConnectWise ConnectWise
Deploying the MSP Process Pod in ConnectWise
In MSP Process, navigate to Integrations -> PSA Integrations and then select your ConnectWise Integration.
Then select the copy button as shown below; you'll need that URL in your clipboard when configuring the MSP Process pod in ConnectWise.
Next, go into ConnectWise and select System -> Setup Tables. Once in setup tables search for the word manage and click into the Managed Hosted API table as shown below:
Click the + sign to add a new entry:
You can then fill in the information below as shown. The link you copied will be pasted into the URL field. Once you fill in the info click Save and Close.
We will then create one more by clicking the + button again and setting up this one as a Service Ticket selection as shown below. All the settings are the same except for the name and the Screen should be set to "Service Ticket". Save and close once finished.
Open your contact under Companies -> Contacts and then click the Plus or Configuration Gear box as shown to add the new Pod to your Contact Screen. Once you do you will need to login with your MSP Process credentials.
Create a service ticket using your contact and add the MSP Process pod to the Service Ticket as shown below.
Please note that each of your users will need to add these pods to their layout (the last two steps above) but they should already be there for them to add to their view.
NOTE: Before completing the steps in this KB article, please setup a Security Role in ConnectWise that has the permissions outlined in this KB article.
Login to ConnectWise as an Admin and select System -> Members -> API Members as shown below:
Click on + as shown below:
Fill out all required fields - including specifying the Role as the one you created earlier - and click the Save button.
Click on API Keys and then click on the + sign to add a new key:
Give it a description and click Save:
The keys will disappear after you click save and close so copy both now to a document or directly into MSP Process before you save and close in ConnectWise.
Now login to MSP Process and navigate to Integrations -> PSA Integrations. Click + to Add CRM and select ConnectWise.
Select ConnectWise
Enter your PSA Connection Details:
The next screen will have you select all your ticket settings. You will need to click Validation after selection and then submit. All fields shown below are required. The other fields are optional.
Verifying End Users within MSP Process Portal Microsoft Authenticator
This article is for verification using MSP Process portal. Some of our integration vendors do not support an embed capability where we can embed our End User verification in their app. In that case you can use the instructions below:
Login to https://app.mspprocess.com
Go to -> Ticketing -> PSA Ticketing
Then search for the ticket number/contact etc and click on the lock to the right to initiate a verification.
Click on the lock button to the right of the ticket you'd like to verify the user on.
Then select the shield next to the Email or Phone Number you wish to use to verify your end user. Make sure the contact on the ticket has a mobile phone number on it if you are attempting to use SMS verification.
Once verified you'll be returned to the verification screen and the contact will show in green for verified as shown below:
How to Setup Live Chat Live Chat
Introduction
The Live Chat widget is a bot that can be embedded on your website, and can handle conversations from prospective clients who are inquiring about the services you provide.
Creating a Live Chat Agent
All things related to Live chat can be found under the AI Service Desk > Live Chats > Live Chats menu. To kick things off, you'll click on the Configurations button:
First you'll want to create a Chat Sequence - the questions that this chat agent will ask someone visiting your website. Click the Chat Sequences button:
Click the Add Sequence button to fill out what questions you want the Live Chat agent to ask:
Here's an example set of questions:
Once you've saved that Chat Sequence, you can create the Live Chat agent itself. Navigate back to the AI Service Desk > Live Chats > Live Chats page, and click on the Configurations button. Then click the Create Configuration button:
- Give your agent a configuration name (i.e. MSP Process Bot)
- Select your PSA configuration
- Give your agent a Widget Title (this name will be shown at the top of your chat window ie Your Company Name Chat Agent)
- Put in your greeting message that will welcome users to your chat when they click it.
- Select Responsible Admins (The admins responsible for receiving Chats and responding)
- Choose an Accent Color for your website
- Decide if you'd like to allow Website visitors to re-open a previous chat or not
Then click Submit.
Deploying the Live Chat Agent to a Website
- From the AI Service Desk > Live Chat > Live Chats page, click the Configurations button
- Click the Copy URL button in the Actions column
- Deploy that code into the body of your website
Congratulations! You've now deployed a fully setup Live Chat agent to your website
Click on the Eye next to any chat to view the chat and respond:
To Turn on notifications when a user initiates a chat Click the profile icon to the top right, then turn on email and/or phone options to be contacted via email or SMS when a user initiates a chat.
Live chats can be seen from the mobile MSP Process Tech App:
From the MSP Process Portal you can also see incoming notifications about chat requests and manage all chats here as well:
If you wish to turn a live chat into a ticket you can do so from this screen after clicking the Eye icon next to the chat.
ConnectWise Security Role Details ConnectWise
Introduction
At MSP Process we believe in only setting the minimum permissions required to leverage our application for your business needs. Please find the outline below along with a more granular review of the permissions.
Adding a Security Role for MSP Process
- Login to your ConnectWise Manager account
- Navigate to System -> Security Roles
- Add a new role, name it MSP Process, and give it the permissions listed below:
| Area | Permission | |
| Companies |
Company Maintenance: Inquire (All) Company/Contact Group Maintenance: Inquire (All) *Configurations: Inquire (All) Contacts: Add/Edit/Inquire (All) CRM/Sales Activities: Inquire (All) Manage Attachments: Add/Inquire (All) Notes: Add/Edit/Inquire (All) Team Members: Inquire (All) |
|
| Finance |
***Agreements: Inquire (All) **Invoicing: Inquire (All) |
|
| Project | Project Tickets: Edit/Inquire (All) | |
| Service Desk |
Close Service Tickets: Add/Edit/Inquire (All) Resource Scheduling: Add/Inquire (All) Service Ticket - Dependancies: Add/Edit/Inquire (All) Service Tickets: Add/Edit/Inquire (All) Service Tickets - Finance: Inquire (All) SLA Dashboard: Inquire (All) Ticket Templates: Inquire (All)
|
|
| System |
Member Maintenance: Inquire (All) My Company: Inquire (All) Table Setup: Inquire (All) |
|
| Time and Expense |
*** Time Entry: Add/Edit/Inquire (All) |
* only required if you're allowing your end-users to link tickets in the MSP Process Client Portal to Configuration Items
** only required if using the Invoices tab within the MSP Process Client Portal
*** only required if you're creating Time Entries from the Ticketing -> PSA Tickets page, or from the MSP Process mobile app
4. Within the System area, click the customize link beside the Table Setup permission (screeshot below):
5. Make sure that the API user you've created has access to the following Setup Tables:
NOTE: The "Allow" column is on the left; the "Disallow" column is on the right.
-
Activities / Activity Status-CRM
-
Activities / Activity Type
-
Company / Company Status
-
Company / Company Type
-
Company / Configuration
-
Company / Configuration Status
- Company / Note Type
-
Company / Team Role
-
Contacts / Communication Type
-
Contacts / Contact Relationship
-
Contacts / Contact Type
-
Contacts / Department
-
General / Auto Sync
-
Scheduling / Location
-
Scheduling / Reminder Time
-
Scheduling / Schedule Status
- Scheduling / Schedule Type
-
Service / Priority
-
Service / Service Board
-
Service / Severity
-
Service / Source
-
Service / Ticket Description Links
-
Service / Ticket Templates
-
Time / Work Role
-
Time / Work Type
6. You may then save and close the MSP Process Security Role.
API Endpoints Used by MSP Process
This is a list of all APIs we get information from or post using the API connections. Please adjust your permissions based on the details below. Please note that some of these API requests are part of other functions of our app and are not needed for End User and SMS utilization.
|
Type |
API (resource) |
Description |
|---|---|---|
|
GET |
|
Check is connection is valid |
|
GET |
|
Get statuses (company filters) |
|
GET |
|
Get types (company filters) |
|
GET |
|
Get statuses (configuration filters) |
|
GET |
|
Get types (configuration filters) |
|
GET |
|
Get configurations |
|
GET |
|
Get all companies |
|
GET |
|
For contact creation |
|
GET |
|
For contact creation |
|
GET |
|
note types |
|
GET |
|
contact notes |
|
GET |
|
contact |
|
GET |
|
contacts count |
|
GET |
|
valiadate client portal credentials |
|
POST |
|
request reset password |
System
|
Type |
API (resource) |
Description |
|---|---|---|
|
GET |
|
Get resources |
|
GET |
|
Get API resources |
|
GET |
|
Get departments |
|
GET |
|
Get audit trial |
|
GET |
|
Get system callbacks |
Finance
|
Type |
API (resource) |
Description |
|---|---|---|
|
GET |
|
Get the list of invoices |
|
GET |
|
Get a specific invoice |
Service
|
Type |
API (resource) |
Description |
|---|---|---|
|
GET |
|
Ticket notes |
|
PATCH |
|
Update ticket note |
|
GET |
|
Ticket timeline |
|
GET |
|
Tickets |
|
GET |
|
Time entries |
|
GET |
|
Priorities |
|
GET |
|
tickets |
|
GET |
|
boards |
|
GET |
|
types |
|
GET |
|
subtypes |
|
GET |
|
items |
|
GET |
|
statuses |
|
GET |
|
impacts |
|
GET |
|
severities |
|
GET |
|
locations |
|
GET |
|
sources |
|
GET |
|
agreements |
Ticket Notes
|
Type |
API (resource) |
Description |
|---|---|---|
|
POST |
|
toggle note type |
Time Entries / Schedule entries
|
Type |
API (resource) |
Description |
|---|---|---|
|
GET |
|
time entries |
|
GET |
|
time entry |
|
GET |
|
work types |
|
GET |
|
work roles |
|
GET |
|
schedule entries |
|
GET |
|
schedule entry |
|
GET |
|
statuses |
Update your Company Logo How to Articles
Click on Settings -> Account Settings -> Settings. Then click on the Upload new Image link:
Contact Update Forms - Sending to Multiple End-Users at Once Contact Update Forms
Bulk Contact Update Forms
They serve two purposes for MSPs. You can allow your users to opt in to receive SMS messaging prior to you sending them for support.
The system will also allow them to update their phone number if it is not the correct number for SMS.
Before you begin we recommend doing two things:
- Setting up your company logo if you haven't already: Update your Company Logo
- Customizing the Subject and Body of the Opt-in e-mail that you'll be sending to your customers: Customize Contact Update Emails and Text Messages
Go to the Contacts page
Filter by name, company, phone number or e-mail address; then select the users you'd like to email the Contact Update form and click the Send Contact Update Form button as shown below:
A review screen will come up that shows you any issues such as an incorrect format of the existing phone number. To receive SMS each contact needs to have the Country Code such as +1 in front of the number for US. We generally recommend emailing the Opt In forms but you can also choose to send via SMS as well as an option or mix and match depending on the company/user.
Click Submit once you are ready to email out the forms. Emails will be sent to everyone in the list and they will have the opportunity to update their contact number from the link in the email.
The system will show if there are any errors (incorrect email/phone number etc):
Here is a sample email received and how it looks if a user opens/clicks on their mobile phone as well:
Any changes on the end-user side will be pushed directly through to your PSA, or M365 as specified and will sync back to our database automatically every 24 hours.
Contact Update Forms - Sending to Individual End-Users Contact Update Forms
Before you begin we recommend doing two things:
- Setting up your company logo if you haven't already: Update your Company Logo
- Customizing the Subject and Body of the Contact Update e-mail that you'll be sending to your customers: Customize Contact Update Emails and Text Messages
You can send one or many Contact Update Forms via email to your clients using the Contacts screen. In the Actions column, click on the Contact Update Form button:
If you'd like to allow your user to update their mobile phone you can check that box. The preferred way to send Contact Update Forms should be email so that you don't send SMS without the users permission.
Users will receive an email similar to the one below:
Once they click the link they will receive a dialog like the one below to confirm they'd like to receive SMS and they can update their phone number in ConnectWise if you've allowed them to do so.
Once they are opted in the system will show that they've opted in, and any changes to the mobile number will be pushed to either your PSA or M365 as specified.
This data is also visible in the MSP Process Pod (for ConnectWise, HaloPSA, Kaseya BMS, Syncro, SuperOps and Zendesk; A green status message shows when someone has opted in:
Context:
PSA Defaults allow you to define the properties of tickets that are created through the "Text to Ticket" feature, and to define what statuses tickets show go to when an end-user sends in follow-up text messages.
Creating a Ticket Default
Go to Integrations -> PSA Integrations
Click on your ConnectWise integration.
- On the right-hand side of the web site, click the Create button
- In the New Ticket Properties section, specify how you'd like things to be configured when MSP Process creates a new ticket for you in ConnectWise
Many MSPs have a Triage service board where tickets first land, and those tickets are then reassigned to other, more appropriate Service Boards. If that's how your ConnectWise environment has been setup, you can specify how you'd like tickets to be updated by clicking the Add Service Board button at the bottom of the page, and selecting a Service Board to configure:
You can add as many additional Service Boards as needed. When ready, click Submit.
Definition of Fields
Name - Give your profile a name
Default Company - This is utilized when the system is not able to match a contact with a company. In this case the ticket will be set to your default company. We usually recommend this be your own business company in your PSA.
Type - Set the ticket type
Subtype - Set the ticket Subtype (optional)
Item - Set the Item (optional)
New Ticket Status - Set the new ticket status. This is the status we will set for new tickets that arrive.
Closed Ticket Status - If you use close a ticket utilizing MSP Process it will use this status unless you select it. If the user closes the ticket it will set it to this status as well.
SMS Received Status - When an SMS is received from a user the system can automatically update the status of the ticket. We usually recommend creating a status such as "SMS Received" that way whoever is working the ticket knows an SMS was received.
Click on the View Icon shown below to see the details about the ticket and SMS chat.
Introduction
Your team will often send the same kinds of text messages to your customers:
- When first starting to interact with an end-user regarding a ticket, they may send something like "Hey - do you have a minute to chat about this ticket you've logged?"
- When closing a ticket, they may send something like " Hey there - it's been great working with you today. I'm glad we got the issue resolved quickly, so I'm going to go ahead and close this ticket."
The Message Templates feature allow you to create pre-built text messages for your team to use - saving them time, preventing typos, and ensuring consistent messaging to your customers.
Managing Message Templates
Click on the Messaging -> Message Templates as shown below.
From templates you can Add, Edit, Clone or delete existing templates.
Using Variables in Message Templates
You can use variables in your Message Templates, and MSP Process will fill them in when your technician chooses to use a Message Template within the context of a ticket:
Here's what things look like for your technician, within our Pod/Insight:
Adding an SMS Channel allows you to create a ticket and enable an SMS chat between you and the contact for the company.
** IMPORTANT NOTE ** The system will use the ticketing defaults that are setup for that SMS Channel so that you don't have to select them each time. This allows you to generate tickets more quickly with less selections.
To enable an SMS Channel go to Messaging -> SMS Channels
Click Add at the top right
Once you click Add then select the Company, Contact and a template or manually type in your subject and message. You can also create templates and use those for faster ticket creation.
Our SMS Channel Configuration Options give you control over how you interact with your customers over SMS. For instance you may not want to allow them to send inbound SMS to create a support ticket depending on your workflows. In this case you can initiate the first SMS and allow the user to respond. Most MSPs are going to a two-way approach allowing their customers to send in tickets this way. It improves time to resolution by allowing customers to communicate on a platform they use all day long, SMS.
How to Configure SMS Channels
Go to Messaging -> Configurations -> Add
CRM - Choose the PSA you intend to use that you've already setup under integrations. If you are an MSP or provider with more than 1 PSA you can utilize multiple ones and setup separate configurations for each.
CRM Defaults - Choose your PSA Defaults that the system will use when a user sends in a ticket it will route to the board/queue with proper settings you've selected.
Phone Number - Select one our avaialble phone numbers or request a new number with your own area code to use. This number can be utilized to send outbound SMS and receive inbound SMS to automatically generate tickets.
Notification Group - Our Notification groups can be setup for On Call Scheduling to notify the technician on call via Email, SMS, Phone Call and Mobile App (coming soon).
Allow Users to Create Channels - This allows your customers to send an SMS to your phone number above to generate a ticket and SMS channel.
Confirm Messages to User - This setting means anytime a user sends in a message, they receive a confirmation text that the system received it and the ticket was updated. The system will by default send them back a message with their ticket info and instructions on the first SMS back to the user.
Put Channels link to ticket - This adds a link to the SMS chat in MSP Process right into the ConnectWise ticket so the technician can easily click right into the SMS chat.